One of the more advanced features we have added to Cart Viper the DotNetNuke ecommerce module is the product visualizer. This feature allows your customers to see a mock-up of what their product will look like once they have made their own selections. For example this feature would allow a customer to see what a t-shirt would look like once they have entered their own custom text and images.
Configuring the product visualizer is straight forward, the 1st step is to add each option for your product as a product variant, following on from our t-shirt example we are going to define 3 variants:
![CropperCapture[4] CropperCapture[4]](http://blog.cartviper.com/image.axd?picture=CropperCapture%5B4%5D_thumb.png)
Once we have defined the variants we can then select the product visualizer link.
The 1st step is to upload a “base image”, the base image is used in the mock-up and the customers selections are then inserted into the base image to let them see what the product would look like with their selections.
Once your base image has been uploaded you must then create a new marker for each product variant you would like to appear on the mock-up. In the below example we are creating a marker for the “T-Shirt Image” variant, by using the image selection tool it is possible to define where the marker should appear on the base image – the users content will then be inserted into the marker.
![CropperCapture[5] CropperCapture[5]](http://blog.cartviper.com/image.axd?picture=CropperCapture%5B5%5D_thumb.png)
In the above example we are expecting a user to upload an image, as the variant “T-Shirt Image” has a control type of “ImageUploader”, however if the control type expected text as the input you can also set the maximum number of characters the user can input, along with the font size, colour and alignment.
It is also worth noting that each marker that has been previously been added is outlined in red to allow you to easily arrange your markers on the base image as you wish, as you can see the “T-Shirt Message” marker has already been added.
Once the product visualizer has been configured for a product the option “View Personalized Product” is outputted on the product details page:
![CropperCapture[9] CropperCapture[9]](http://blog.cartviper.com/image.axd?picture=CropperCapture%5B9%5D_thumb.png)
When clicked upon the user will be able to view the mock-up of their product in a modal popup window:
![CropperCapture[6] CropperCapture[6]](http://blog.cartviper.com/image.axd?picture=CropperCapture%5B6%5D_thumb.png)
If an order is placed for a product the customer and store admin will be able to view the mock-up at anytime by logging in and viewing their order management sections.
Cart Viper is available for a free 14 day trial, if you have any questions please contact us.
5a20cac9-5976-4b50-86f2-39966abf111e|0|.0|27604f05-86ad-47ef-9e05-950bb762570c
Continuing on with the theme of showing new features added to Cart Viper our Ecommerce module for DotNetNuke, we are going to look at the new feature Store Promotions.
Using Store Promotions allows you to have a store or category wide sale, so for example I could discount the category Fireworks by 5% for 4th July weekend.
A Store Promotion takes a start and end allow you to define the terms of the deal for you customers.
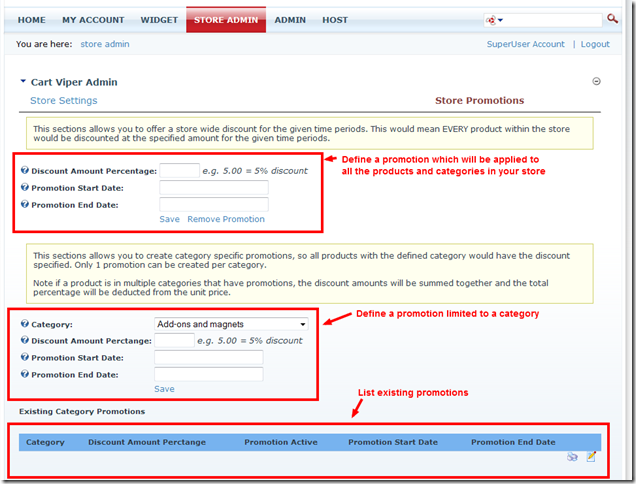
When you define a promotion for a category, that discount will only apply to products within that category. It will not be applied to any products defined within sub categories of the category.
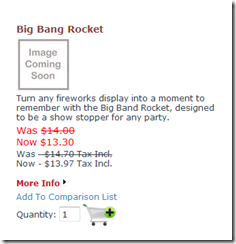
Once the promotion is within the activation dates defined the product(s) will then display in the store like the example below.
82327548-56db-48c8-be33-bdb61687ac97|0|.0|27604f05-86ad-47ef-9e05-950bb762570c
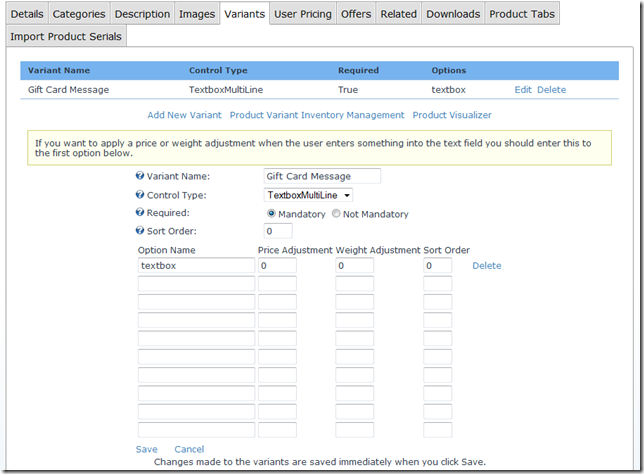
Since the release of 1.3.0 of Cart Viper we’ve added two additional controls you can use to collect variant data for a product.
- Textbox Multi-line – allows customer to enter multiple lines of text for a product option.
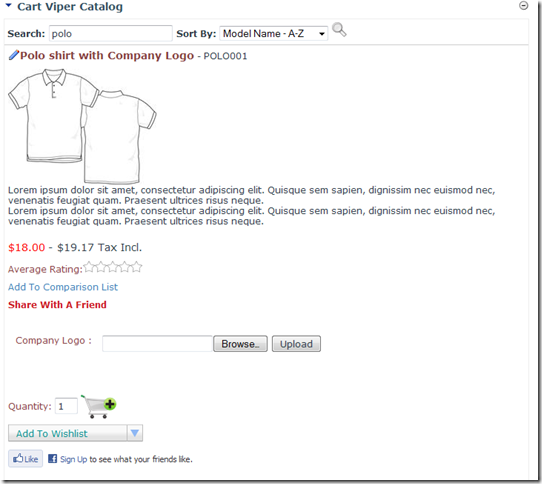
- Image Upload – allows the customer to upload an image, this could be for personalisation of a product with a photo for example.
Defining a product with the TextboxMultiLine variant allows the customer to enter some message for the item they are purchasing, this is great for a gift card message for example.
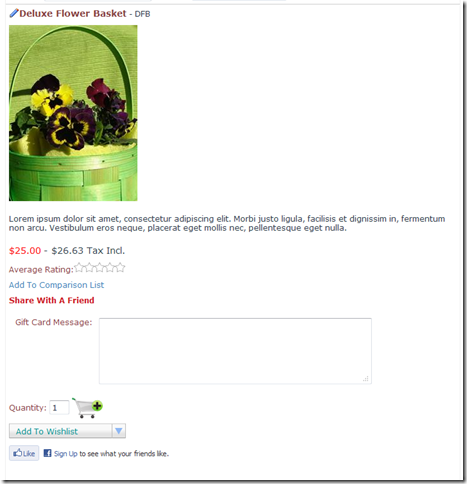
In the store front the customer is able to supply the details they would like added to the Gift Card in the example below. This text is listed on the order once its placed.
The image upload control allows the customer to upload an image to your store which is then available to download by the store owner once the order is placed.
This could be used to collect a photo that is to be printed on a personalised item for example like a t shirt.
7eee1ea8-74b5-4a3a-ab37-3332e914ce95|0|.0|27604f05-86ad-47ef-9e05-950bb762570c
As a store owner you need to be able to locate orders quickly, some times you’ll find the customer doesn’t know or have their order number to hand, so to make it easy we’ve added a search feature to the order history management.
This allows the store administrator the ability to search for an order by a name, the search takes a partial name and returns all the orders which match.

This is just one of many small improvements we’ve added to Cart Viper 1.3.0 to make running your store a more pleasant experience.
742a1945-dccc-4de9-a6fb-c475fc30770f|0|.0|27604f05-86ad-47ef-9e05-950bb762570c
A new feature adding into Cart Viper 1.3.0 onwards is the ability to define a shipping band that applies to the US lower 48, US Alaska and US Hawaii.
We still have the ability to define a shipping rate for the whole of the US but using these three new additional locations allows you to charge a different shipping amount for delivery to AL and HI for example.
Take a look at the example setup below, I’ve defined a rate for the lower 48, AL and HI, during the checkout the cart will look at the customer’s State shipping address and use this to determine which rate to apply to the basket.

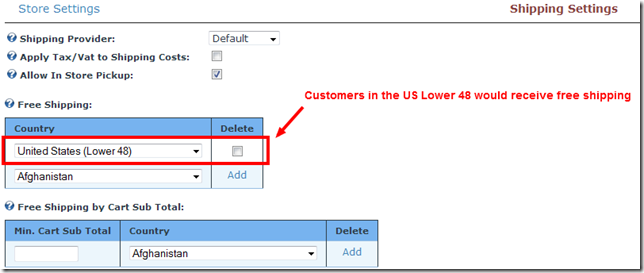
We’ve also taken the opportunity to improve the free shipping option, before this was either on or off. Now we’ve added the ability to define the country that the free shipping is applied to.
This also has the US lower 48, US Alaska and US Hawaii options so you could define a rule which allows free shipping to the lower 48 and just use the shipping banding above to charge a shipping amount for customers in AL and HI and the rest of the world for example.
If you like what you see, why not take the free trial of Cart Viper and give it a try for yourself.
5629652d-9193-4a41-8596-9b24890c24cb|0|.0|27604f05-86ad-47ef-9e05-950bb762570c
Added in release 1.3.0 of Cart Viper is the ability for the store administrator to edit the billing and shipping addresses for an order placed by a customer.
If a customer makes a mistake during the order process and contacts your customer services department you can now update the order with the correct details.
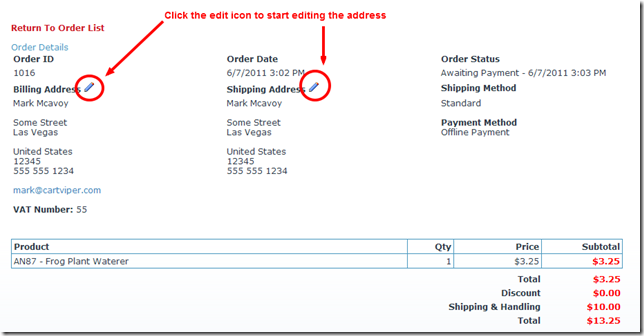
Once you have clicked the edit icon simple modify the entry using the popup window.
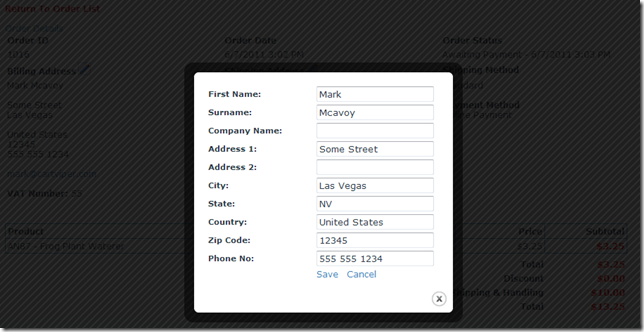
This is just one of the many improvements we’ve made to Cart Viper to help improve the ecommerce experience for the store owner and the customer.
If you’ve got some improvements you would like to see implement please contact us.
70c16c5f-6980-44a0-b7e4-4c37d4d65bde|0|.0|27604f05-86ad-47ef-9e05-950bb762570c
In previous versions of Cart Viper we had two roles that you could use to assign management options for the store admin page.
- Manage Orders
- Manage Store
The Manage Store role give you the ability to do all the day to day task such as creating products, updating categories etc. However it also give you all the setup options for defining a payment gateway and tax options.
Displaying the full range of options available can be overwhelming to some store owners, the store owner’s technology partner has already taken care of setting up the payment gateway and tax options for example.

To create a simpler experience we’ve created a new role called Manage Catalog this allows uses with the defined role to see a more streamlined store admin page tailored to managing products, reviews, categories, coupons and promotions.

If you where to assign a user to both the Manage Orders and Manage Catalog role then they would have a simple store admin page that allows them to run their store without displaying all the configuration options for payment, tax, shipping etc.

Defining the roles required for each security group is set using the Store Admin page, simply select from the drop down the role required.
58036fe8-b96a-4567-8879-4b0e4b19e61d|0|.0|27604f05-86ad-47ef-9e05-950bb762570c
In Store Pickup is a feature which has become very popular in recent years, allowing a customer to purchase items online then pickup then up in the store themselves. Cart Viper store owners can now optionally allow customers to pickup their online order in store. We’ve added the ability to allow “In Store Pickup” in version 1.3 of Cart Viper our shopping cart module for DotNetNuke.
This feature is optional so if you don’t want to offer In Store Pickup the ecommerce store will operate without it.
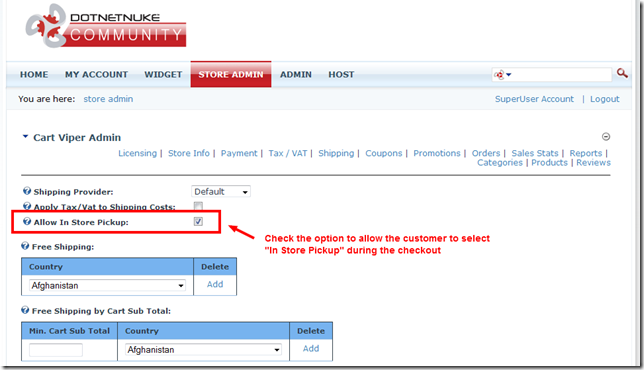
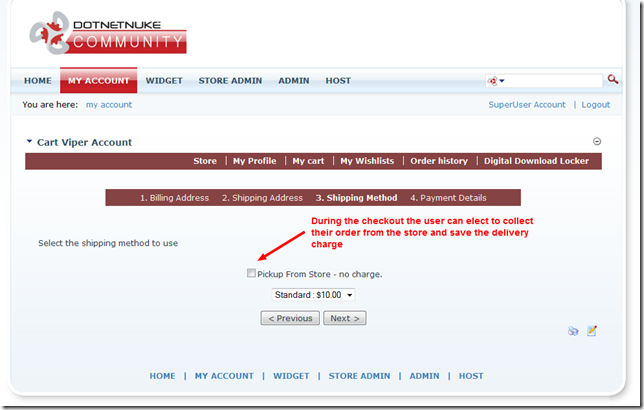
To enable In Store Pickup the store admin would simple need to select the option in the shipping admin page. Once checked this allows customers to select this option during the checkout.
When a customer selects In Store Pickup the delivery charge will be zero for that order. Both the store owner and the customer would get the standard order confirmation email with the delivery option set to “In Store Pickup”.
1b02b737-8d94-43e4-93c5-57138d135018|0|.0|27604f05-86ad-47ef-9e05-950bb762570c
The latest version of Cart Viper 1.3.0 now allows you to optionally allow the customer to enter some additional notes about their order during the order process.
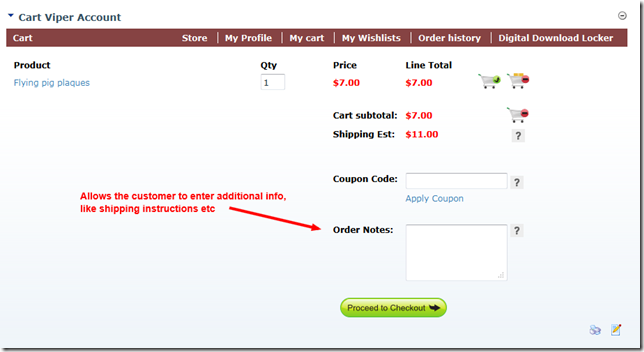
This allows for cases where the user wants to enter some shipping information or purchase order details during the order process.
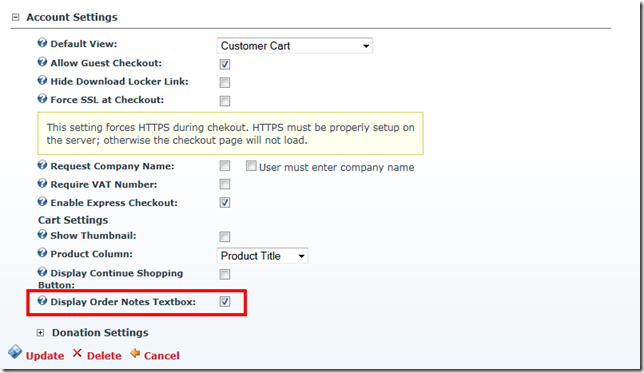
As the store admin you can turn on the optional order notes using the settings page on the my account module.
During the order process the customer can then enter whatever notes they need, the notes will then be visible to the store admin when viewing the completed order.
4bf0bab0-b845-4b9e-b382-ce6f5a726bb9|0|.0|27604f05-86ad-47ef-9e05-950bb762570c
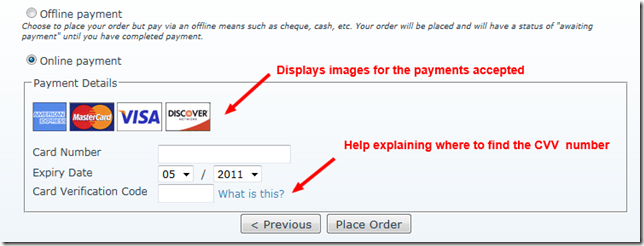
The new release 1.3 of Cart Viper our shopping cart solution for DNN now has an improved checkout process which shows the icons of the credit cards accepted in your store.
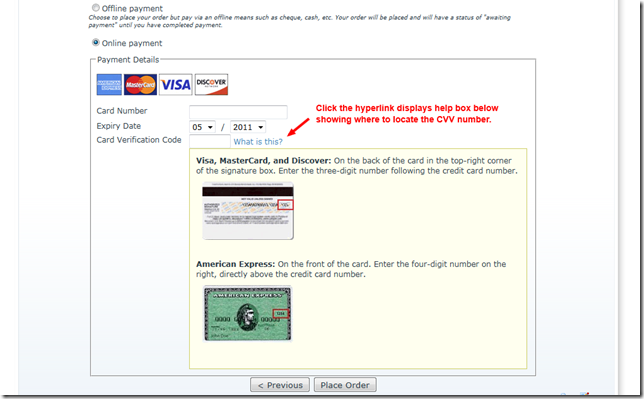
Additionally we’ve made the checkout process easier to give customer help to locate the the CVV number for a credit card.
This is all part of our continually improvement in Cart Viper to make it easier for customers to checkout, thus increasing your conversion rate.
Customising the Credit Card Icons and CVV Help
The changes to the checkout are fully customisable allowing you to display your own credit card icons and cvv help in place of the standard out of the box version.
To change the credit card accepted image you simple need to modify the a resource file for the payment gateway, then this file will be displayed to the browser.
The key in the resource file to change is creditCardLogoFileName.Text this should then just contain the filename of the image to display. The file should be placed into the /Portals/x/CVStore/Templates/Images folder.
Customising the CVV help follows a similar format, however for that we use three keys in the resource file of the selected payment provider.
| Key Name |
Description |
| cvvHelp.Text |
The body of the help message this can contain HTML. |
| cvvHelpRearImage.Text |
Filename of the image to use for the rear image of a credit card showing the location of the CVV. |
| cvvHelpFrontImage.Text |
Filename of the image to use for the front image for a credit card showing the location of the CVV. |
We recommend that you view the existing entry for the cvvHelp.Text item and use this as the basis for your own customisations. Checkout the guide to customising the resource files used in Cart Viper for additional information.
a00f450a-9f38-41ec-8308-68ed5b409342|0|.0|27604f05-86ad-47ef-9e05-950bb762570c