 Continuing the series about new features coming in release 1.0.3 of Cart Viper today I’m going to talk about the additional currency support that has been added.
In the initial release transaction where limited to Euros, GBPs or USDs. However in 1.0.3 of the shopping cart we’ve added support for Australian dollars (AUD), Canadian dollars (CAD), Mexican peso (MXN) and Swiss francs (CHF).
We’ve also moved the currency symbols for each currency into the SharedResources.resx file in App_LocalResources so this give you complete control on how you you would like to display the currency symbol. You can simply edit the default entries as required.
| Resource Key | Currency | Value |
| Currency_AUD.Text | AUD | AUD $ |
| Currency_CAD.Text | CAD | CAD $ |
| Currency_CHF.Text | CHF | CHF |
| Currency_EURO.Text | EURO | € |
| Currency_GBP.Text | GBP | £ |
| Currency_MXN.Text | MXN | Mex $ |
| Currency_USD.Text | USD | $ |
If you would like additional currencies add just get in touch and we’ll try our best to help you out.
Stay tuned for more posts about up coming features!
f222b8c0-e2f0-49e4-857c-59f10824747b|0|.0|27604f05-86ad-47ef-9e05-950bb762570c
Continuing the series of posts about new features in release 1.0.3 of Cart Viper its time to look at the Wish List feature.
This allows users to store a list of items they would like to purchase.
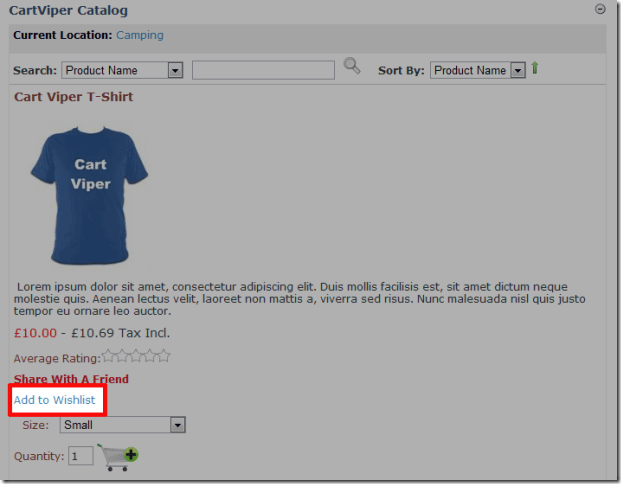
On the product details page a user would simple click the Add to Wishlist link to have the item store for them in their wish list.

The wish list is display on the My Account page with the ability for the user to add an item into their cart directly from the wish list.
All wish lists are private and only the user that created the list is able to view it.

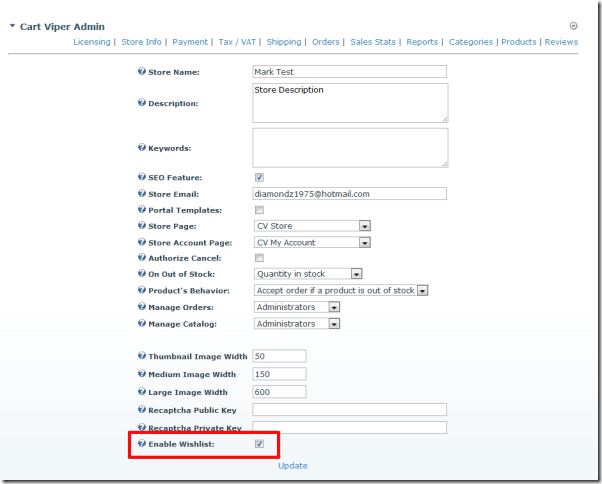
Allowing your users to create wish lists is an optional feature, you can disable wish lists by unchecking the Enable Wishlist in the store admin.

6f6e7d2b-1379-4b25-85b5-f2244d3e963c|0|.0|27604f05-86ad-47ef-9e05-950bb762570c
 Everyone loves getting a bargain. So we’ve decided to make our own bargain by putting Cart Viper our shopping cart for Dotnetnuke on sale at 33% off the normal list price.
This means a single portal license is available for $100 (normally $150) and a host license for $200 (normally $300) but you need to be quick this offer is only on until the 20th September 2010.
Buy direct or from SnowCovered
Remember we offer a life time free upgrade to the latest versions as they become available.
ec8cc624-d402-46e9-a848-cf045ba4dfc6|0|.0|27604f05-86ad-47ef-9e05-950bb762570c
On our site we list a road map of features for Cart Viper, this comes straight out of Trac in this post I’m going to explain how we do this.
![CropperCapture[475] CropperCapture[475]](http://blog.cartviper.com/image.axd?picture=CropperCapture%5B475%5D_thumb.png)
On the Trac server we’ve created a custom query for each version Cart Viper we want to publish the road map for.
![CropperCapture[476] CropperCapture[476]](http://blog.cartviper.com/image.axd?picture=CropperCapture%5B476%5D_thumb.png)
The query in affect limits the tickets to a given version of Cart Viper.
![CropperCapture[477] CropperCapture[477]](http://blog.cartviper.com/image.axd?picture=CropperCapture%5B477%5D_thumb.png)
Once you’ve created the feeds you can then access the tickets via the RSS feed for each query.
So over in DotNetNuke simple add the News Feed Module to the page and configure it with the URL for the Trac feed and the correct credentials.
Then using our custom XSLT file and a bit of jQuery we get the finished result.
1: <?xml version="1.0"?>
2: <xsl:stylesheet version="1.0" xmlns:xsl="http://www.w3.org/1999/XSL/Transform">
3: <xsl:output method="html" indent="yes"/>
4: <xsl:param name="ItemsToShow"/>
5: <xsl:param name="ShowItemDetails"/>
6: <xsl:param name="ShowItemDate"/>
7: <xsl:param name="Locale"/>
8: <xsl:template match="rss">
9: <xsl:for-each select="channel/item[position()<=$ItemsToShow or $ItemsToShow<1]">
10: <div class="cvRoadMapItem Normal">
11: <p class="cvRoadMapTitle">
12: <a href="#" class="cvRoadMapLink">
13: <xsl:value-of select="title"/>
14: </a>
15: </p>
16: <xsl:if test="$ShowItemDate='true'">
17: <div class="cvRoadMainDate">
18: <xsl:value-of select="pubDate"/>
19: </div>
20: </xsl:if>
21: <xsl:if test="$ShowItemDetails='true'">
22: <div class="cvRoadMainDesc" style="display:none;">
23: <xsl:value-of select="description" disable-output-escaping="yes"/>
24: </div>
25: </xsl:if>
26: </div>
27: </xsl:for-each>
28: </xsl:template>
29: </xsl:stylesheet>
1: jQuery(document).ready(function(){
2:
3: jQuery(".cvRoadMapLink").toggle(function(){
4: jQuery(this).parents().siblings(".cvRoadMainDesc").show('fast');
5: },
6: function(){
7: jQuery(this).parents().siblings(".cvRoadMainDesc").hide('fast');
8: });
9:
10: });
0da8cce1-f028-46dc-bed4-1b97adfdd087|0|.0|27604f05-86ad-47ef-9e05-950bb762570c
After what seems like weeks and weeks of coding we appear to be closing in on our first release of Cart Viper.
What is Cart Viper?
Cart Viper is an advanced ecommerce module for DotNetNuke. Its allows you create a shop and start selling goods and digital downloads in minutes.
We’ve focused on making Cart Viper simple to start using but powerful for advanced users. We’ll be discussing more about the features in the future.
Why Cart Viper?
We are two developers from the UK that have already had success with creating DNN modules but where disappointed with the current ecommerce modules out there. So we decided to do something about it, hence the blog you’re reading now.
Stay tuned.
4a5d74c7-8010-4a32-8c06-b7abd8685a93|0|.0|27604f05-86ad-47ef-9e05-950bb762570c