View from inside the viper

Wendy Warren Jewellery–Testimonial

  September 14, 2011 20:01
by Mark

Its always great to hear from our clients, recently Sharon Ensbury from WSI Captivating Web Solutions created the ecommerce store Wendy Warren Jewellery using Cart Viper. Here is what Sharon has to say about the experience.

“I have used Cart Viper on www.wendywarrenjewellery.co.uk a uk based jewellery site that to date has 500 products.  The module was very cost effective, and installation straight forward.  The module comes with a .CSV file for importing the products and categories and linking to images and we found that to be easy to use too. Further down the line the client decided they wanted to change the categories of the products and on a Bank Holiday Monday afternoon, I contacted cart viper who responded within hours telling me how to do it. I really would recommend this product to anyone searching for an e commerce solution for DNN.”

Wendy Warren Jewellery


Using Skin Objects in Cart Viper – Part 2

  August 28, 2011 15:08
by Mark

Part 1 of of using skin object in Cart Viper focused on using an existing skin objects to add content to the templates used in our module. This part will focus on how to create custom skin objects to manipulate the product and category objects in Cart Viper.

Since release 1.4.0 we have add the ability for you to customise the output of the store using skin object, today I want to show you an advanced feature that lets you write custom code in .net to create skin objects which you can use in the store templates.

Lets take an example, I’ve got my store all setup but really want to display the logo for the manufacturer of each product. Cart Viper has no way to do this, however creating a custom skin object we can read the manufacturer value for the product and output a logo with ease.
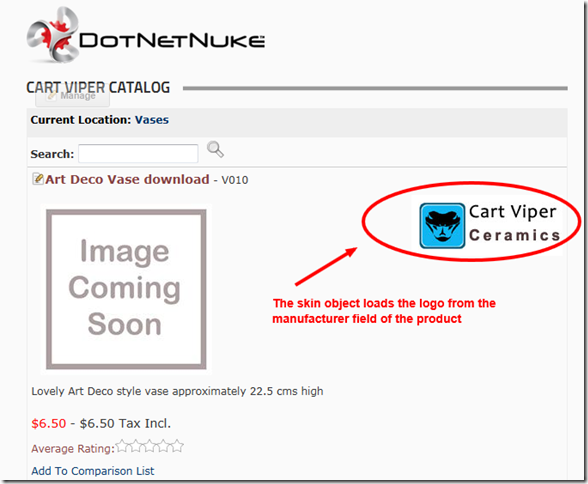
Display an icon for the manufacturer


Displaying a Manufacturer Logo for a Product

Lets take a walk through creating the skin object to see how it works.

First I’ve uploaded my logos into a folder I’ve created in my portal home directory. I’m going to have my skin object display these on the product details page.
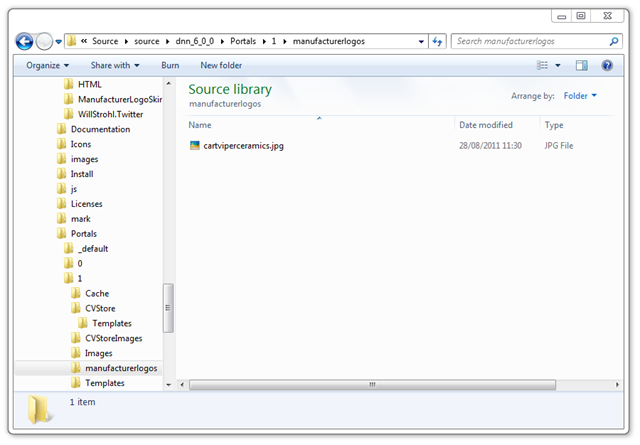
Folder contain the logos to use for the products

Next I’m going to create a new project in Visual Studio, I just need a Web Application Project, its important that we create this with in the DesktopModules folder. Notice that we don’t need to check “Create directory for solution”.
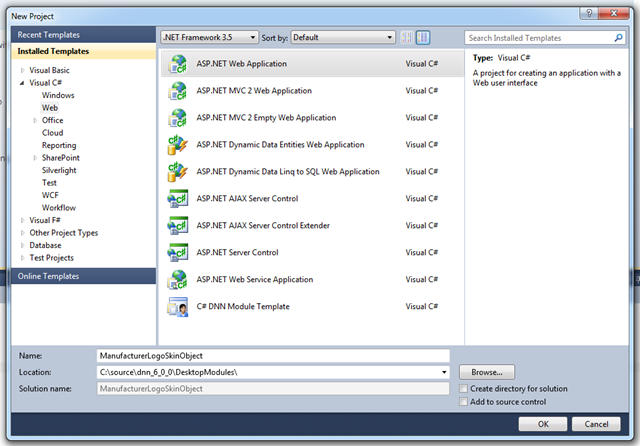
Creating the new project for the skin object

In order to create a skin object we need to inherit from a base class in DotNetNuke plus we want to use an interface from Cart Viper to allow the skin object to get Product object.
So we need to add two references to files located in the /bin folder of the portal.
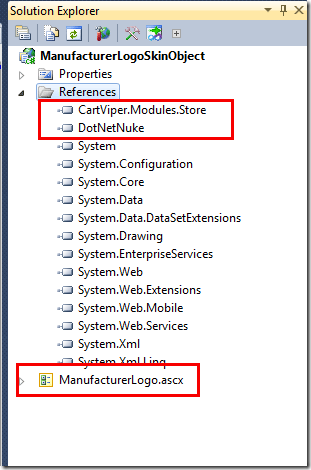
Solution explorer showing the reference and the singel ascx control

When first creating the project Visual Studio will create some default folders and files which we don’t need so I’ve deleted those and added a single web User Control called ManfacturerLogo.ascx.

An important setting you need to make is to have the build output directly into the /bin folder of the portal.
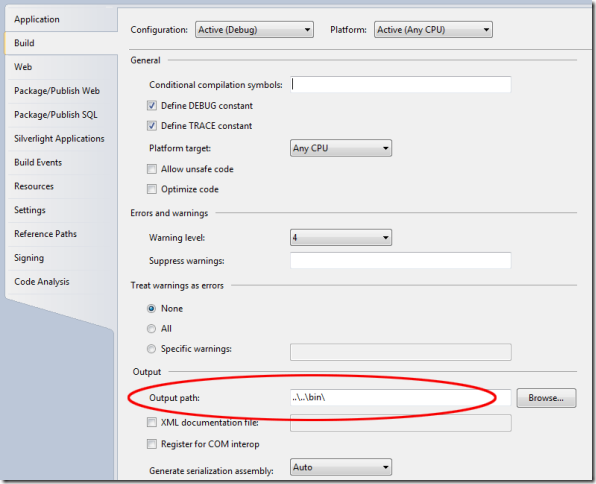
Setting the build output path to the /bin folder

Lets take a look at the code in the ascx file, I’ve just got an image control which will output the logo for the manufacturer.

<%@ Control Language="C#" AutoEventWireup="true" 
CodeBehind="ManufacturerLogo.ascx.cs" 
Inherits="ManufacturerLogoSkinObject.ManufacturerLogo" %>

<asp:Image runat="server" ID="imgManLogo" Visible="false"/>

Looking at the code behind file shows how the skin object works.

using System;
using System.Collections.Generic;
using System.Linq;
using System.Web;
using System.Web.UI;
using System.Web.UI.WebControls;
using DotNetNuke.UI.Skins;
using CartViper.Modules.Store.Components.SkinObject;

namespace ManufacturerLogoSkinObject
{
    public partial class ManufacturerLogo : SkinObjectBase, ICartViperSkinObject
    {
        protected void Page_Load(object sender, EventArgs e)
        {
            if (Product != null)
            {
                //get the manufacturer value, if its not null or empty
                //make into the path to the url for the logos folder
                string manufacturer = Product.Manufacturer;
                if (!string.IsNullOrEmpty(manufacturer))
                {
                    imgManLogo.ImageUrl = string.Format(
											PortalSettings.HomeDirectory + 
											"ManufacturerLogos/{0}.jpg", 
											manufacturer.Replace(" ", ""));

                    imgManLogo.AlternateText = manufacturer;
                    imgManLogo.Visible = true;
                }
            }
        }


        public CartViper.Modules.Store.Catalog.CategoryInfo Category
        {
            get;
            set;
        }

        public CartViper.Modules.Store.Catalog.ProductInfo Product
        {
            get;
            set;
        }
    }
}

Looking at the code the important parts to notice the class inheritance, we need to use SkinObjectBase which is located in the DotNetNuke.UI.Skins as the base class.
We are also implementing the interface CartViper.Modules.Store.Components.SkinObject.ICartViperSkinObject this interface allows the template engine in Cart Viper the ability to set the properties Category and Product with the current product data.

Note its only in the following templates that the ICartViperSkinObject properties will be set by the template engine.

  • ProductDetail.htm
  • ProductList.htm

In other templates the Category and Product properties will not be set and will be null.

The main work is completed in the Page_Load method, we check to see if we have Product object and then if the product has a value for the manufacturer property. We then remove all spaces from the manufacturer value and load that as the image source.

To use the module in DotNetNuke we need to have a DNN file to install the skin object.

<?xml version="1.0" encoding="utf-8" ?>

<dotnetnuke type="Package" version="5.0">
    <packages>      
        
    <package name="ManufacturerLogo" type="SkinObject" version="01.00.00">
        <friendlyName>ManufacturerLogo</friendlyName>
        <description>ManufacturerLogo</description>
        <owner>
            <name>Cart Viper</name>
            <organization>CartViper</organization>
            <url>www.cartviper.com</url>
            <email>mark@cartviper.com</email>
        </owner>
        <license/>
        <releaseNotes/>
        <components>
            <component type="SkinObject">
                <moduleControl>
                    <controlKey>MANUFACTURERLOGO</controlKey>
                    <controlSrc>
			DesktopModules\ManufacturerLogoSkinObject\ManufacturerLogo.ascx
					</controlSrc>
                    <supportsPartialRendering>False</supportsPartialRendering>
                </moduleControl>
            </component>
            <component type="File">
                <files>
                    <basePath>
					DesktopModules\ManufacturerLogoSkinObject
					</basePath>
                    <file>
                        <name>ManufacturerLogo.ascx</name>
                    </file>
                </files>
            </component>
            <component type="Assembly">
                <assemblies>
                    <assembly>
                        <path>bin</path>
                        <name>ManufacturerLogoSkinObject.dll</name>
                        <version>01.00.00</version>
                    </assembly>
                </assemblies>
            </component>
        </components>
    </package>
      
    </packages>
</dotnetnuke>

Then finally we just add the skin object into our ProductDetail.htm to get the manufacturer logo into the product details page.

<div class="StoreDetailContainer">
  <div class="StoreDetailContainer-Content">
    <div class="Normal productDetailPadding">[EDIT][MODELNAME] - [MODELNUMBERVALUE]</div>
    <div style="float:right">[SKINOBJECT:MANUFACTURERLOGO]</div>
    <div class="Normal productDetailPadding">
        [MEDIUMIMAGE]    
        <div style="clear:both;"></div>
        [ADDITIONALIMAGESGALLERY]
        <div style="clear:both;"></div>
        [DESCRIPTION]
    </div>
    <div class="StoreClear productDetailPadding">[MSRP]</div>
    <div class="StoreClear productDetailPadding">[PRICE] [VATPRICE]</div>
	<div class="Normal genericColour productDetailPadding">[AVERAGERATING]</div>
    <div class="productDetailPadding">[ADDTOCOMPARISONLIST]</div>
    <div>[EMAILAFRIEND]</div>
    <div>[PRODUCTVARIANTS]</div>
    <div class="productDetailPadding">[PRODUCTVISUAZLIER]</div>
    <div class="genericColour addToCartWrapper">[ADDQUANTITY] [ADDTOCART]</div>
     <div>[ADDTOWISHLIST]</div>
    <div style="clear:both;"></div>
    <div class="Normal productDetailPadding">[FACEBOOKLIKEBUTTON]</div>
  </div>
</div>

Conclusion

Using skin objects is a great way to customise Cart Viper, its lets you inject your own code and UI controls into the templates. Using this feature will let you tailor Cart Viper to your requirements with ease.

Download the source file


Using Skin Objects in Cart Viper Templates – Part 1

  August 26, 2011 18:28
by Mark

Since the first release of Cart Viper our DotNetNuke store we have supported a template based design and layout within our module. This allows the module to fit perfectly within a site simply by customising some XHTML files. Within the template files we have tokens which are replaced with data by the template engine when viewing the the store in a browser.

With the release of 1.4.0 we’ve taken this a step further and now allow you to insert skin objects into a template. The skin object will then be rendered into the template when browsing the store just like how we replace tokens.

Simple Skin Object Example

An existing skin object which comes as standard with DNN is the CURRENTDATE skin object, this when added to a template will output the current date.

A list of existing skin objects in DNN

As a very simple demo I’m going to modify the Product Detail (ProductDetail.htm) template to output this skin object after the model number at the top of the page.

To inject a skin object into a template we use [SKINOBJECT:NAME] where name is the skin object name, in this case CURRENTDATE.

<div class="StoreDetailContainer">
  <div class="StoreDetailContainer-Content">
    <div class="Normal productDetailPadding">[EDIT][MODELNAME] - [MODELNUMBERVALUE] [SKINOBJECT:CURRENTDATE]</div>
    <div class="Normal productDetailPadding">
        [MEDIUMIMAGE]    
        <div style="clear:both;"></div>
        [ADDITIONALIMAGESGALLERY]
        <div style="clear:both;"></div>
        [DESCRIPTION]
    </div>
    <div class="StoreClear productDetailPadding">[MSRP]</div>
    <div class="StoreClear productDetailPadding">[PRICE] [VATPRICE]</div>
	<div class="Normal genericColour productDetailPadding">[AVERAGERATING]</div>
    <div class="productDetailPadding">[ADDTOCOMPARISONLIST]</div>
    <div>[EMAILAFRIEND]</div>
    <div>[PRODUCTVARIANTS]</div>
    <div class="productDetailPadding">[PRODUCTVISUAZLIER]</div>
    <div class="genericColour addToCartWrapper">[ADDQUANTITY] [ADDTOCART]</div>
     <div>[ADDTOWISHLIST]</div>
    <div style="clear:both;"></div>
    <div class="Normal productDetailPadding">[FACEBOOKLIKEBUTTON]</div>
  </div>
</div>

When we then view the product details page you can see we’ve added the current date to the template.

Outputting the CURRENTDATE skin object in a template

Skin objects are regular ASP.Net objects so they can contain properties, using our template we can set values for the properties using this syntax.

[SKINOBJECT:MYSKINOBJECT(propertyName1,propertyValue1,propertyName2,propertyValue2,…)]

So we could set the property DateFormat on the CURRENTDATE skin object to allow us to just display the year.

Here is our template with the property set.

<div class="StoreDetailContainer">
  <div class="StoreDetailContainer-Content">
    <div class="Normal productDetailPadding">[EDIT][MODELNAME] - [MODELNUMBERVALUE] [SKINOBJECT:CURRENTDATE(DateFormat,"yyyy")]</div>
    <div class="Normal productDetailPadding">
        [MEDIUMIMAGE]    
        <div style="clear:both;"></div>
        [ADDITIONALIMAGESGALLERY]
        <div style="clear:both;"></div>
        [DESCRIPTION]
    </div>
    <div class="StoreClear productDetailPadding">[MSRP]</div>
    <div class="StoreClear productDetailPadding">[PRICE] [VATPRICE]</div>
	<div class="Normal genericColour productDetailPadding">[AVERAGERATING]</div>
    <div class="productDetailPadding">[ADDTOCOMPARISONLIST]</div>
    <div>[EMAILAFRIEND]</div>
    <div>[PRODUCTVARIANTS]</div>
    <div class="productDetailPadding">[PRODUCTVISUAZLIER]</div>
    <div class="genericColour addToCartWrapper">[ADDQUANTITY] [ADDTOCART]</div>
     <div>[ADDTOWISHLIST]</div>
    <div style="clear:both;"></div>
    <div class="Normal productDetailPadding">[FACEBOOKLIKEBUTTON]</div>
  </div>
</div>

The output now simply shows the current year.

Setting a property of a SKINOBJECT

The ability to add skin objects into your templates opens up the range of possibilities and ideas you can now implement.

We aren’t finished there we have one more Skin Object trick which you can use to make great ecommerce sites, take a look at Using Skin Objects in Cart Viper – Part 2 to see how you can extend Cart Viper using templates.


Using the Subversion Revision Number in NAnt

  August 20, 2011 18:37
by Mark

We have recently updated our NAnt build script used to build Cart Viper to include the revision number from Subversion. So now when we build the project it will update all the build numbers of the DLLs to have a revision number equal to the revision number from Subversion.

DLL build number as set using NAnt script

In the example above the major, minor and build numbers come from a property we define in the NAnt script, so we just need to change this to increment all the DLLs to the new number.

The revision number of 2250 is the revision number from Subversion, so in the future we now that this DLL was compiled using revision 2250 of our code base. This is automatically read from Subversion using the script below.

Read the Revision Number from Subversion

Note we use TortoiseSVN so we are using a binary from that program to get the revision number.

First we need to commit a special text file to the Subversion repo, this file contains a token which when we output the file from the repo will be replaced with the latest SVN revision number.
The file should just contain the token

$WCREV$

Contents of the rev.txt

Make sure you commit the file into the repo, my file is call rev.txt

For our build process we have a sub folder off the root of the project called build which contains the NAnt script and the revision file.

In the NAnt build script we have the init target which handles updating the build number.

<target name="init">
    <!-- basic verison number to set for the DLLs -->
    <property name="shortVersion" value="1.4.1"/>
    
    <property name="build.version.revision" value="0" />

	<exec program="subwcrev" basedir="C:\Program Files\TortoiseSVN\bin" 
		commandline='./ rev.txt revvalue.txt' failonerror="false"/>

The part that does the work is the exec element, this calls the subwcrev command line tool to output the rev.txt file to a file called revvalue.txt. This will have the effect of replacing the token with the reversion number.

Now we need to read the contents of the file into a property in NAnt.

    <loadfile file="./revvalue.txt" property="build.version.revision"/> 

Updating the AssemblyInfo.cs Files in NAnt

The final thing we need to do is take the version numbers we have and replace these in all the AssemblyInfo.cs files in our project.
To do this we need to use some custom code in the script. Remember we have our build file in a sub folder off the root of the main project file. So we need to move up one level, you may need to change this in relation to the location of the NAnt build file and the project root (see line 12).

<!-- run some custom code to find all the files then 
         update the rev number to the one we've just read from 
         subversion --> 
     <script language="C#"> 
          <references> 
              <include name="System.dll" /> 
          </references> 
          <imports> 
              <import namespace="System.Text.RegularExpressions" /> 
          </imports> 
          <code> 
            <![CDATA[ 
              public static void ScriptMain(Project project) { 
                  DirectoryInfo baseDirectory =  new DirectoryInfo(project.BaseDirectory); 
                  DirectoryInfo rootDirectory = baseDirectory.Parent; 
                  
                  string buildNumber = project.Properties["shortVersion"].Replace("\r\n", ""); 
                  string revisionBuild = project.Properties["build.version.revision"].Replace("\r\n", ""); 
                  StringBuilder buffer = new StringBuilder(); 
                  
                  var files = rootDirectory.EnumerateFiles("AssemblyInfo.cs", SearchOption.AllDirectories); 
                  
                  foreach(FileInfo fi in files){ 
                    string fileContents; 
                  
                    using(FileStream stream = fi.Open(FileMode.Open, FileAccess.ReadWrite )){ 
                      using(StreamReader reader = new StreamReader(stream)){ 
                        fileContents = reader.ReadToEnd(); 
                        
                        //set the assemblyVersion 
                        string assemVersion = Regex.Match(fileContents, @"\[assembly: AssemblyVersion.*").Value; 
                        
                        if(!string.IsNullOrEmpty(assemVersion)){ 
                          buffer.Append(assemVersion.Substring(0, assemVersion.IndexOf('"') + 1)); 
                          buffer.Append(buildNumber); 
                          buffer.Append("."); 
                          buffer.Append(revisionBuild); 
                          buffer.Append("\")]"); 
                          
                          fileContents = fileContents.Replace(assemVersion, buffer.ToString()); 
                          buffer.Clear(); 
                        } 
                        
                        //set the AssemblyFileVersion 
                        string assemFileVersion = Regex.Match(fileContents, @"\[assembly: AssemblyFileVersion.*").Value; 
                        if(!string.IsNullOrEmpty(assemFileVersion)){ 
                          buffer.Append(assemFileVersion.Substring(0, assemFileVersion.IndexOf('"') + 1)); 
                          buffer.Append(buildNumber); 
                          buffer.Append("."); 
                          buffer.Append(revisionBuild); 
                          buffer.Append("\")]"); 
                          fileContents = fileContents.Replace(assemFileVersion, buffer.ToString()); 
                          buffer.Clear(); 
                        } 
                      } 
                    } 
                    
                    using(FileStream stream = fi.Open(FileMode.Truncate, FileAccess.Write)){ 
                      using(StreamWriter writer = new StreamWriter(stream)){ 
                        writer.Write(fileContents); 
                      } 
                    } 
                    
              } 
            } 
            ]]> 
          </code> 
      </script> 
</target>

Now when you build the script the build numbers will be updated automatically.


Improved Sale Stats Page

  August 16, 2011 15:11
by Mark

Running an online shop means you need to be able monitor your store and see how well it performing, in previous versions of Cart Viper we had the Sales Stats page within the Store Admin. This page displays information about your sales, we’ve improved this in Cart Viper 1.4.0 to be even better.

  • More graphs for at a glance performance indication.
  • More data to get a better understanding of how your store is doing
  • We’ve also included a graph which shows abandoned carts, these are carts which have been created but the customer never completed the checkout process.

New and improved Sales Stats page

Rolling over the graphs then displays a popup.

Graph showing hovering over a data point

The graphs are rendered using Javascript and no data is ever sent to a 3rd party. The graphs are created locally on the server.


Display Images using a Zoom Effect

  August 11, 2011 14:54
by Mark

Over the last couple of months we’ve been working on the new release of Cart Viper 1.4.0 which went live earlier this week. We are proud of our product and think its a great platform for anyone wanting to set up a store using DotNetNuke a CMS package for ASP.net.

Just because our product is $150 we don’t believe that should mean its not rich with features and fully functional. Recently we worked on a project which had the need to display the product image using a zoom feature.

Store owners can choose between using the standard modal popup to display a product image or use the product zoom feature. Change the display type is a simple setting change for the Cart Viper Catalog module, expand the Product Details Settings and set the Image Mode setting to correct mode.

product image mode settings

Currently for the setting we have two options

  • Modal Popup – Clicking the image will display a large image in a modal javascript popup.
  • Image Zoom – Hovering over the image will display a close up image of the current area selected.

Modal Popup Example

modalpopupimage

Image Zoom Example

imagezoom

We hope you see this is another useful feature of Cart Viper and a reason for you to take a closer look at our product with the free trial.


Variant Caption Improvement

  August 11, 2011 14:28
by Mark

Continuing on with the series of new features added to Cart Viper 1.4.0 is the ability to define a default value for a drop down variant option.
This allows you write a caption which helps the customer understand the meaning and purpose of the variant for the product.

For example if we have a product which is available in different sizes we can define the caption to be “Please select a size” when editing the product.

Defining a default caption for a product

Then when viewing the product in the store front you can see the drop down has the caption selected.
Variants which are mandatory require the customer to select a valid option, its not possible to add the product to the cart when the default caption is the selected item in the drop down list.

Variant display a default caption

One of the many improvements and new features all available in the latest release of Cart Viper. As always we have a free 14 day trial so you can test drive these features for yourself.


Digital Download Improvements

  August 10, 2011 14:45
by Mark

We’ve made some improvements to the digital download features based on customer feedback in Cart Viper 1.4.0. All these features relate to products which have a download, once the customer has paid for the order they can then download the file to their computer.

Direct Link on the Order Details

The customer’s order details now displays a link to the download file. Allowing them to start the download without needing to visit the digital download locker.

Link to the download is now listed on the order details page

Ability to Display a Thumbnail Image in the Digital Download Locker

We’ve added the ability to display a thumbnail for the digital download product when viewing the Digital Download Locker.
To enable this feature just check Show Product Thumbnail as shown below.

download_locker_setting

Then when viewing the Digital Download Locker the product thumbnail will be displayed.

Digital download locker with thumbnail images enabled

Additional File Format Support

Previously the only type of file that could be attached to a product as a digital download was a zip file. This has now be expanded to allow PDF files to be attached as a download.


Editing an Order

  August 10, 2011 08:37
by Mark

Another new feature we’ve added to Cart Viper is the ability to edit the customer’s address and email details on an order that has been placed. So the next time a customer enters the wrong email you can easily change this on their order. Previous version of Cart Viper only allowed editing of the address now we’ve added the email address as an editable field.

Simply locate the order in the Store Admin > Orders page and view the details. Beside the address is the standard DotNetNuke edit icon which brings up the dialog to edit the address and email details.

Editing an order address or email

Edit order details dialog


Checkout Options

  August 9, 2011 14:34
by Mark

In our DotNetNuke shopping cart Cart Viper we’ve recently improved the checkout process to give the store administrator more control over the user experience during the checkout.

Previously we had a simple 4 step checkout process, during each stage different information is collected from the user to complete the order. This checkout is still there and works exactly the same as before but we’ve added a 3 step and single checkout process.

The default checkout process is the 4 step checkout however going to the Store Admin > Payment page within Cart Viper now has the option to select the checkout to use.

Store admin allows you to set the checkout to use


4 Step Checkout

4 Stage checkout process

The user completes the order process using a 4 step checkout process. This is the default checkout used in Cart Viper.


3 Step Checkout

3 Stage checkout process

The checkout process has 3 steps to complete the order process. This is a new checkout process we've added into release 1.4.0.


Single Step Checkout

Single Stage checkout process

The checkout process uses a single page and makes use of AJAX to update the relevant data. This is a new checkout process added into release 1.4.0.