View from inside the viper

Using Skin Objects in Cart Viper Templates – Part 1

  August 26, 2011 18:28
by Mark

Since the first release of Cart Viper our DotNetNuke store we have supported a template based design and layout within our module. This allows the module to fit perfectly within a site simply by customising some XHTML files. Within the template files we have tokens which are replaced with data by the template engine when viewing the the store in a browser.

With the release of 1.4.0 we’ve taken this a step further and now allow you to insert skin objects into a template. The skin object will then be rendered into the template when browsing the store just like how we replace tokens.

Simple Skin Object Example

An existing skin object which comes as standard with DNN is the CURRENTDATE skin object, this when added to a template will output the current date.
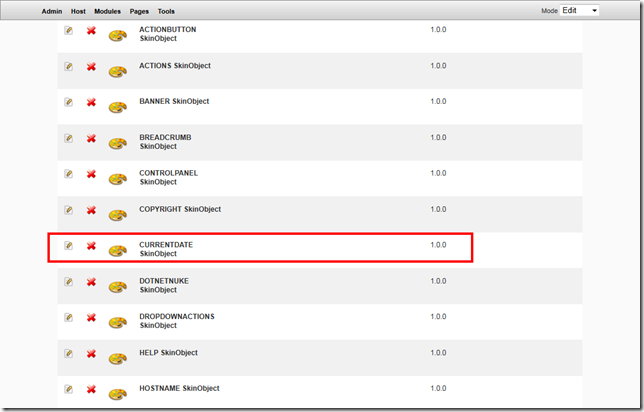
A list of existing skin objects in DNN

As a very simple demo I’m going to modify the Product Detail (ProductDetail.htm) template to output this skin object after the model number at the top of the page.

To inject a skin object into a template we use [SKINOBJECT:NAME] where name is the skin object name, in this case CURRENTDATE.

<div class="StoreDetailContainer">
  <div class="StoreDetailContainer-Content">
    <div class="Normal productDetailPadding">[EDIT][MODELNAME] - [MODELNUMBERVALUE] [SKINOBJECT:CURRENTDATE]</div>
    <div class="Normal productDetailPadding">
        [MEDIUMIMAGE]    
        <div style="clear:both;"></div>
        [ADDITIONALIMAGESGALLERY]
        <div style="clear:both;"></div>
        [DESCRIPTION]
    </div>
    <div class="StoreClear productDetailPadding">[MSRP]</div>
    <div class="StoreClear productDetailPadding">[PRICE] [VATPRICE]</div>
	<div class="Normal genericColour productDetailPadding">[AVERAGERATING]</div>
    <div class="productDetailPadding">[ADDTOCOMPARISONLIST]</div>
    <div>[EMAILAFRIEND]</div>
    <div>[PRODUCTVARIANTS]</div>
    <div class="productDetailPadding">[PRODUCTVISUAZLIER]</div>
    <div class="genericColour addToCartWrapper">[ADDQUANTITY] [ADDTOCART]</div>
     <div>[ADDTOWISHLIST]</div>
    <div style="clear:both;"></div>
    <div class="Normal productDetailPadding">[FACEBOOKLIKEBUTTON]</div>
  </div>
</div>

When we then view the product details page you can see we’ve added the current date to the template.
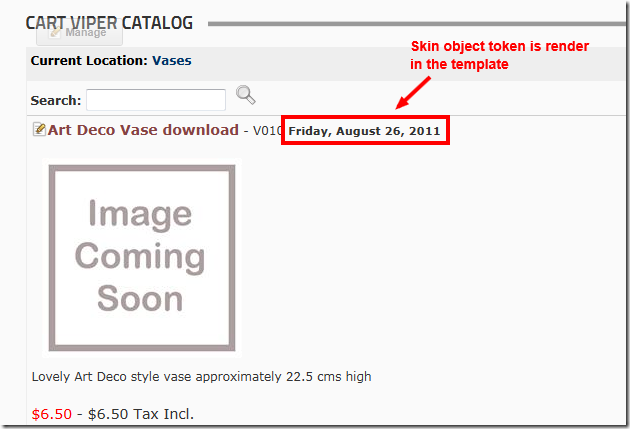
Outputting the CURRENTDATE skin object in a template

Skin objects are regular ASP.Net objects so they can contain properties, using our template we can set values for the properties using this syntax.

[SKINOBJECT:MYSKINOBJECT(propertyName1,propertyValue1,propertyName2,propertyValue2,…)]

So we could set the property DateFormat on the CURRENTDATE skin object to allow us to just display the year.

Here is our template with the property set.

<div class="StoreDetailContainer">
  <div class="StoreDetailContainer-Content">
    <div class="Normal productDetailPadding">[EDIT][MODELNAME] - [MODELNUMBERVALUE] [SKINOBJECT:CURRENTDATE(DateFormat,"yyyy")]</div>
    <div class="Normal productDetailPadding">
        [MEDIUMIMAGE]    
        <div style="clear:both;"></div>
        [ADDITIONALIMAGESGALLERY]
        <div style="clear:both;"></div>
        [DESCRIPTION]
    </div>
    <div class="StoreClear productDetailPadding">[MSRP]</div>
    <div class="StoreClear productDetailPadding">[PRICE] [VATPRICE]</div>
	<div class="Normal genericColour productDetailPadding">[AVERAGERATING]</div>
    <div class="productDetailPadding">[ADDTOCOMPARISONLIST]</div>
    <div>[EMAILAFRIEND]</div>
    <div>[PRODUCTVARIANTS]</div>
    <div class="productDetailPadding">[PRODUCTVISUAZLIER]</div>
    <div class="genericColour addToCartWrapper">[ADDQUANTITY] [ADDTOCART]</div>
     <div>[ADDTOWISHLIST]</div>
    <div style="clear:both;"></div>
    <div class="Normal productDetailPadding">[FACEBOOKLIKEBUTTON]</div>
  </div>
</div>

The output now simply shows the current year.
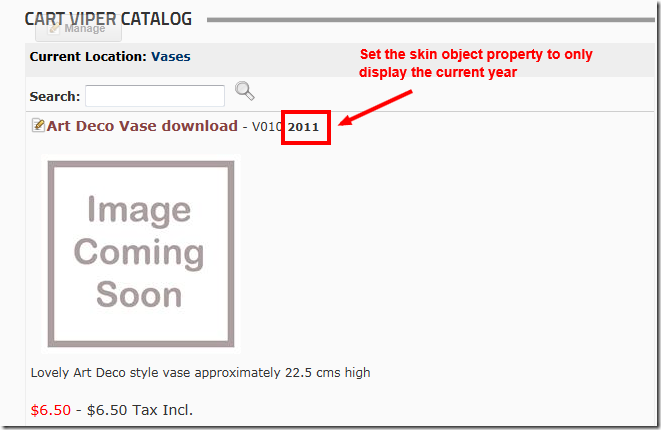
Setting a property of a SKINOBJECT

The ability to add skin objects into your templates opens up the range of possibilities and ideas you can now implement.

We aren’t finished there we have one more Skin Object trick which you can use to make great ecommerce sites, take a look at Using Skin Objects in Cart Viper – Part 2 to see how you can extend Cart Viper using templates.


Improved Sale Stats Page

  August 16, 2011 15:11
by Mark

Running an online shop means you need to be able monitor your store and see how well it performing, in previous versions of Cart Viper we had the Sales Stats page within the Store Admin. This page displays information about your sales, we’ve improved this in Cart Viper 1.4.0 to be even better.

  • More graphs for at a glance performance indication.
  • More data to get a better understanding of how your store is doing
  • We’ve also included a graph which shows abandoned carts, these are carts which have been created but the customer never completed the checkout process.

New and improved Sales Stats page

Rolling over the graphs then displays a popup.

Graph showing hovering over a data point

The graphs are rendered using Javascript and no data is ever sent to a 3rd party. The graphs are created locally on the server.


Multiple Payment Options

  August 16, 2011 11:09
by Nigel

One of the new features of Cart Viper the DNN shop, that has the potential to take your ecommerce website to the next level is the ability to now specify multiple payment options. This means that as well as accepting credit cards payment direct on your website you can also enable Paypal Web Payments Standard as an additional payment option.

This has the added benefit of catering for customers who would prefer to not share their credit cards details with your store, therefore increasing your sales conversion rate and ultimately making your online presence more profitable.

The multiple payment option is supported by our single page, 3 stage and 4 stage checkout options, so the store admin has complete control over the checkout user experience. Configuring your store to accept multiple payment options is straight forward you simply need to:

1) Via the payment section 1st select the payment gateway you wish to process credit card transactions:

CropperCapture[3]

In our example we will use authorize.net however you could also select First Data or PayPal Pro.

2) The next step is to click “accept PayPal payment” and complete all the sections:

CropperCapture[4]

3) The final step is then to select which checkout option you would like either single page, 3 stage or 4 stage checkout – in our example we will use “SinglePage”:

CropperCapture[5]

Now when the user attempts to checks out they now have the option to enter their credit card details directly on the site or be transferred to Paypal to complete the transaction:

CropperCapture[6]

Note as well as accepting Paypal web payment standards and credit cards on your site, you can also enable Google Checkout and offline payment, this gives the store admin the flexibility to offer the payment mechanisms that best suit their business needs.

Cart Viper now supports the following payment options:

  • Authorize.Net
  • First Data
  • Google Checkout
  • Multi Safe
  • PayPal Website Payments Standard
  • PayPal Website Payments Pro
  • Prepaid Payment Points
  • Offline Payment
  • Request For Quote

If there is a payment gateway you would like to see in that list please contact us and we would be happy to discuss it with you.


Gift Certificates

  August 15, 2011 14:15
by Nigel

A further new feature that was added into the 1.4.0 release of Cart Viper the advanced DotNetNuke ecommerce solution is the ability to use gift certificates.

Gift certificates function in a similar fashion to the existing coupons feature in that they can be given to customers to allow them to receive a discount on the items they are going to purchase. The key difference is that gift certificates can be segregated into groups and the generation of gift certificates can be automated.

With this in mind if your store is going to distribute thousands of codes – then gift certificates would be used instead of coupons to make the process less labour intensive.

To use gift certificates you simply need to follow the below steps:

Within the gift certificate section of the store admin you need to create a “Gift certificate” group the gift certificate defines the rules that the gift certificate must conform to e.g. discount amount, start / end date etc.

Each group can contain an unlimited number of gift certificates that will be automatically generated based on the rules for the group you define.

gift cert group admin

The below table summarizes the fields for the gift certificate group:

CropperCapture[3]

The gift certificates are now ready to distribute to your customers, you can view all the gift certificates for the group, and quickly and easily see if they have been used by a customer and which order they were applied to:

view gift certs

Individual gift certificates can be disabled / deleted or the entire group can be disabled meaning no gift certificates in that group will be valid to use. It is also possible to export a groups gift certificates in .CSV format so they could be processed by some 3rd party application.

If you have any feature requests please contact us and we would be happy to discuss them with you.


Product Now Supports Datasheet

  August 12, 2011 15:29
by Nigel

Continuing our discussion on new features in release 1.4 of the DotNetNuke ecommerce solution Cart Viper we are going to look at the ability to attach a PDF datasheet to a product.

To attach a datasheet to a product you 1st need to upload the PDF file using the standard file manager from the “admin” menu, once this is complete simply navigate to the Cart Viper store admin and select the product you wish to select the file for.

You will notice we now have a datasheet section where you can use the standard DNN file selector to select the PDF file you uploaded in step 1:

datasheet_select

In order to have the PDF outputted on your product details page you need to ensure the token [DATASHEET] is in the template ProductDetail.htm

product details template

This will then output a PDF icon that when clicked upon will display the PDF you uploaded – note for products that do not have a datasheet defined the PDF icon will not be outputted.

datasheet_link


Calculate Shipping Costs By DNN Role

  August 12, 2011 15:05
by Nigel

One of the new features that was included in release 1.4 of Cart Viper the DotNetNuke ecommerce solution is the ability to calculate shipping costs based upon the DNN role of the user.

shipping by dnn role

As you can see in the above screen shot we have defined 4 shipping bands, so any customer that have the DNN role “registered Users” will be able to select from all 4 bands (provided their shipping address is in the United States and the weight of the items in their cart met the criteria for these bands).

However if the user was checking out anonymously or their DNN account did not have the role “registered users” they would only be able to select from the “Standard” or “Special Delivery” bands – provided their shipping address was in the United States and the weight of the items in their cart met the criteria for these bands.

The advantage of this feature is that you can give discounted shipping bands to loyal customers, Cart Viper can now calculate shipping costs based upon:

  • Real time shipping calculating via FedEx, USPS and UPS.
  • Define a standard shipping rate on all orders.
  • Define an unlimited amount of shipping rates by cart weight, speed of delivery and shipping destination.
  • Define an unlimited amount of shipping rates by cart subtotal, speed of delivery and shipping destination.
  • Define an unlimited amount of standards of shipping for each country e.g. saver, super saver, next day, etc.
  • Define the shipping charge as a percentage of the cart sub-total.
  • If no shipping rates are defined for a users country, customers are prompted to contact the store for a quote.
  • Optionally charge VAT or tax on shipping costs.
  • Optionally define a product as "free shipping" so regardless of the shipping rules in place, this product will not incur a shipping cost.
  • In store pick up option.

If your business has a shipping model that is not covered, please contact us and we would be happy to discuss it with you.


Display Images using a Zoom Effect

  August 11, 2011 14:54
by Mark

Over the last couple of months we’ve been working on the new release of Cart Viper 1.4.0 which went live earlier this week. We are proud of our product and think its a great platform for anyone wanting to set up a store using DotNetNuke a CMS package for ASP.net.

Just because our product is $150 we don’t believe that should mean its not rich with features and fully functional. Recently we worked on a project which had the need to display the product image using a zoom feature.

Store owners can choose between using the standard modal popup to display a product image or use the product zoom feature. Change the display type is a simple setting change for the Cart Viper Catalog module, expand the Product Details Settings and set the Image Mode setting to correct mode.

product image mode settings

Currently for the setting we have two options

  • Modal Popup – Clicking the image will display a large image in a modal javascript popup.
  • Image Zoom – Hovering over the image will display a close up image of the current area selected.

Modal Popup Example

modalpopupimage

Image Zoom Example

imagezoom

We hope you see this is another useful feature of Cart Viper and a reason for you to take a closer look at our product with the free trial.


Variant Caption Improvement

  August 11, 2011 14:28
by Mark

Continuing on with the series of new features added to Cart Viper 1.4.0 is the ability to define a default value for a drop down variant option.
This allows you write a caption which helps the customer understand the meaning and purpose of the variant for the product.

For example if we have a product which is available in different sizes we can define the caption to be “Please select a size” when editing the product.

Defining a default caption for a product

Then when viewing the product in the store front you can see the drop down has the caption selected.
Variants which are mandatory require the customer to select a valid option, its not possible to add the product to the cart when the default caption is the selected item in the drop down list.

Variant display a default caption

One of the many improvements and new features all available in the latest release of Cart Viper. As always we have a free 14 day trial so you can test drive these features for yourself.


Digital Download Improvements

  August 10, 2011 14:45
by Mark

We’ve made some improvements to the digital download features based on customer feedback in Cart Viper 1.4.0. All these features relate to products which have a download, once the customer has paid for the order they can then download the file to their computer.

Direct Link on the Order Details

The customer’s order details now displays a link to the download file. Allowing them to start the download without needing to visit the digital download locker.

Link to the download is now listed on the order details page

Ability to Display a Thumbnail Image in the Digital Download Locker

We’ve added the ability to display a thumbnail for the digital download product when viewing the Digital Download Locker.
To enable this feature just check Show Product Thumbnail as shown below.

download_locker_setting

Then when viewing the Digital Download Locker the product thumbnail will be displayed.

Digital download locker with thumbnail images enabled

Additional File Format Support

Previously the only type of file that could be attached to a product as a digital download was a zip file. This has now be expanded to allow PDF files to be attached as a download.


Editing an Order

  August 10, 2011 08:37
by Mark

Another new feature we’ve added to Cart Viper is the ability to edit the customer’s address and email details on an order that has been placed. So the next time a customer enters the wrong email you can easily change this on their order. Previous version of Cart Viper only allowed editing of the address now we’ve added the email address as an editable field.

Simply locate the order in the Store Admin > Orders page and view the details. Beside the address is the standard DotNetNuke edit icon which brings up the dialog to edit the address and email details.

Editing an order address or email

Edit order details dialog