One of the more advanced features we have added to Cart Viper the DotNetNuke ecommerce module is the product visualizer. This feature allows your customers to see a mock-up of what their product will look like once they have made their own selections. For example this feature would allow a customer to see what a t-shirt would look like once they have entered their own custom text and images.
Configuring the product visualizer is straight forward, the 1st step is to add each option for your product as a product variant, following on from our t-shirt example we are going to define 3 variants:
![CropperCapture[4] CropperCapture[4]](http://blog.cartviper.com/image.axd?picture=CropperCapture%5B4%5D_thumb.png)
Once we have defined the variants we can then select the product visualizer link.
The 1st step is to upload a “base image”, the base image is used in the mock-up and the customers selections are then inserted into the base image to let them see what the product would look like with their selections.
Once your base image has been uploaded you must then create a new marker for each product variant you would like to appear on the mock-up. In the below example we are creating a marker for the “T-Shirt Image” variant, by using the image selection tool it is possible to define where the marker should appear on the base image – the users content will then be inserted into the marker.
![CropperCapture[5] CropperCapture[5]](http://blog.cartviper.com/image.axd?picture=CropperCapture%5B5%5D_thumb.png)
In the above example we are expecting a user to upload an image, as the variant “T-Shirt Image” has a control type of “ImageUploader”, however if the control type expected text as the input you can also set the maximum number of characters the user can input, along with the font size, colour and alignment.
It is also worth noting that each marker that has been previously been added is outlined in red to allow you to easily arrange your markers on the base image as you wish, as you can see the “T-Shirt Message” marker has already been added.
Once the product visualizer has been configured for a product the option “View Personalized Product” is outputted on the product details page:
![CropperCapture[9] CropperCapture[9]](http://blog.cartviper.com/image.axd?picture=CropperCapture%5B9%5D_thumb.png)
When clicked upon the user will be able to view the mock-up of their product in a modal popup window:
![CropperCapture[6] CropperCapture[6]](http://blog.cartviper.com/image.axd?picture=CropperCapture%5B6%5D_thumb.png)
If an order is placed for a product the customer and store admin will be able to view the mock-up at anytime by logging in and viewing their order management sections.
Cart Viper is available for a free 14 day trial, if you have any questions please contact us.
5a20cac9-5976-4b50-86f2-39966abf111e|0|.0|27604f05-86ad-47ef-9e05-950bb762570c
Continuing on with the theme of showing new features added to Cart Viper our Ecommerce module for DotNetNuke, we are going to look at the new feature Store Promotions.
Using Store Promotions allows you to have a store or category wide sale, so for example I could discount the category Fireworks by 5% for 4th July weekend.
A Store Promotion takes a start and end allow you to define the terms of the deal for you customers.
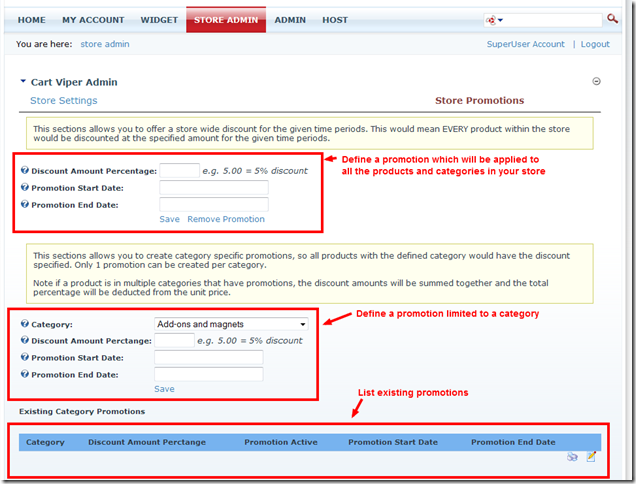
When you define a promotion for a category, that discount will only apply to products within that category. It will not be applied to any products defined within sub categories of the category.
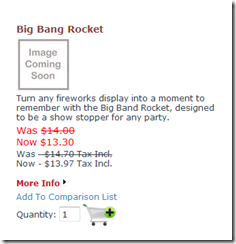
Once the promotion is within the activation dates defined the product(s) will then display in the store like the example below.
82327548-56db-48c8-be33-bdb61687ac97|0|.0|27604f05-86ad-47ef-9e05-950bb762570c
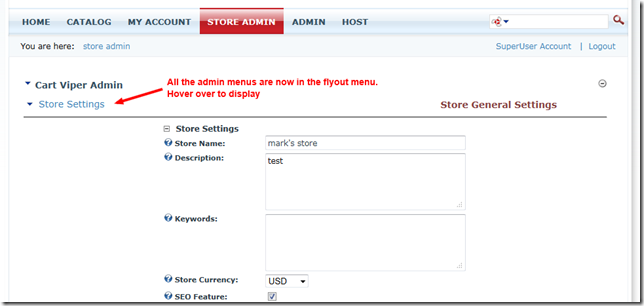
We are constantly trying to improve Cart Viper our Ecommerce Store for DotNetNuke, one of the new improvements in release 1.3.1 was an improve admin menu.
Previous we had all the Store Admin options listed as hyperlinks on the Admin page, however there is only so much room and we couldn’t group related options together.

We’ve followed the current trend of using a mega menu style menu to allow us to group the options together and also to take up much less real estate on the screen.
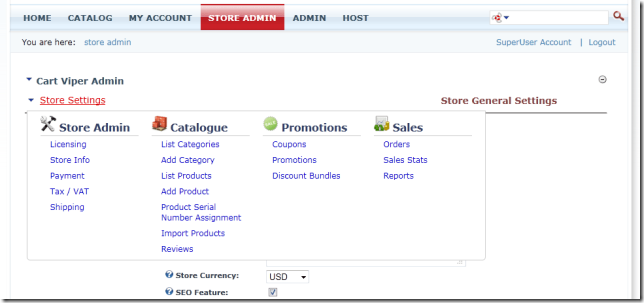
We hope you like the new feature, we’re already working on the next release of Cart Viper which will have even more improvements and features.
9a5761ed-2dd4-4412-bd6e-135ac500a26c|0|.0|27604f05-86ad-47ef-9e05-950bb762570c
We are always pleased to hear feedback and comments from users of Cart Viper. It is even better when we get a comment like this one from Steve Bonikowski at Quantum IT Ltd.
“Just thought we'd show you one of our sites that uses Cart Viper. http://www.northhallsaddlery.co.uk/
We're really pleased with Cart Viper it was easy to set up and performs well. The best part is the support and the rapid development of enhancements and issues.”

521482c1-2a07-4eaa-b95d-5f9ad3d75a2f|0|.0|27604f05-86ad-47ef-9e05-950bb762570c
Since the release of 1.3.0 of Cart Viper we’ve added two additional controls you can use to collect variant data for a product.
- Textbox Multi-line – allows customer to enter multiple lines of text for a product option.
- Image Upload – allows the customer to upload an image, this could be for personalisation of a product with a photo for example.
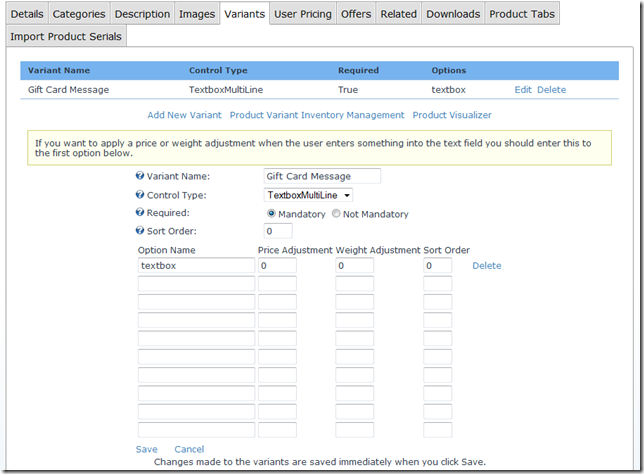
Defining a product with the TextboxMultiLine variant allows the customer to enter some message for the item they are purchasing, this is great for a gift card message for example.
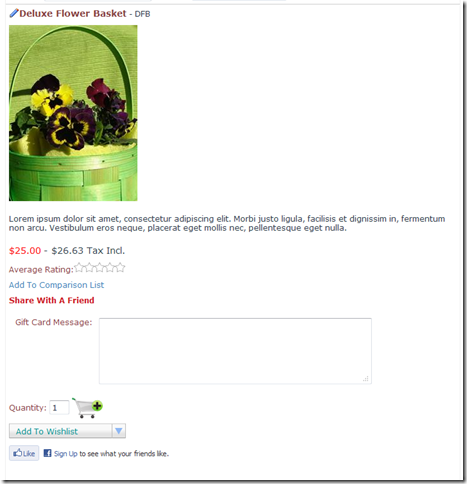
In the store front the customer is able to supply the details they would like added to the Gift Card in the example below. This text is listed on the order once its placed.
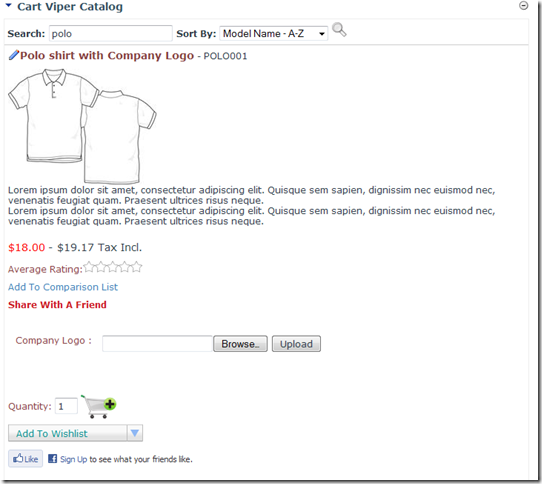
The image upload control allows the customer to upload an image to your store which is then available to download by the store owner once the order is placed.
This could be used to collect a photo that is to be printed on a personalised item for example like a t shirt.
7eee1ea8-74b5-4a3a-ab37-3332e914ce95|0|.0|27604f05-86ad-47ef-9e05-950bb762570c
During testing of Cart Viper you may want to remove orders from the store once you’ve finished testing, this isn’t a feature which is available in the store admin however you could use the script below to mark an order as cancelled and hidden from the UI.
This is purely for use during testing, you shouldn’t use this script when your store is in production.
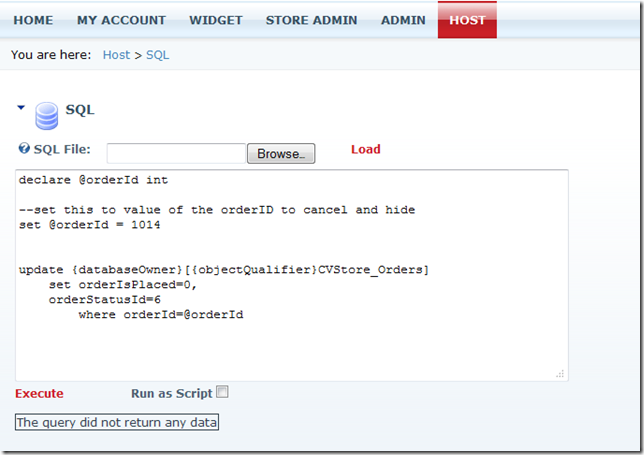
Simply set the @orderId to the id of the order to remove. In the example below this will cancel and hide the order 1014.
declare @orderId int
--set this to value of the orderID to cancel and hide
set @orderId = 1014
update {databaseOwner}[{objectQualifier}CVStore_Orders]
set orderIsPlaced=0,
orderStatusId=6
where orderId=@orderId
This script should be executed using Host – SQL page within your portal.
64a2d842-ebe9-4b0b-b7f5-36193428372d|0|.0|27604f05-86ad-47ef-9e05-950bb762570c
Just to let you all know we have just released version 1.3.1 of Cart Viper our DotNetNuke ecommerce module the full list of new features are:
As ever we will be doing follow up blogs highlighting each new feature.
b574a962-e24e-414b-baac-965006724e01|0|.0|27604f05-86ad-47ef-9e05-950bb762570c
In any ecommerce store you’ll get customers that never checkout with their cart.
Recently we were asked about how to determine the number of abandoned carts in Cart Viper, this is something we’ve got on the road map for a later release (built-in report to display the number of abandoned carts).
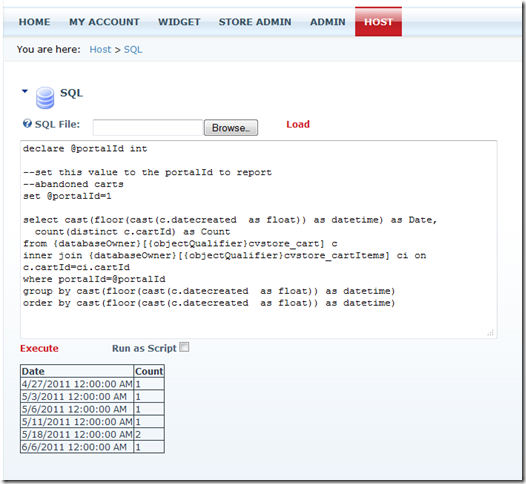
So we’ve created this simple script that you can execute using the Host – SQL page within your DotNetNuke portal.
declare @portalId int
--set this value to the portalId to report
--abandoned carts
set @portalId=0
select cast(floor(cast(c.datecreated as float)) as datetime) as Date,
count(distinct c.cartId) as Count
from {databaseOwner}[{objectQualifier}cvstore_cart] c
inner join {databaseOwner}[{objectQualifier}cvstore_cartItems] ci on c.cartId=ci.cartId
where portalId=@portalId
group by cast(floor(cast(c.datecreated as float)) as datetime)
order by cast(floor(cast(c.datecreated as float)) as datetime)
Executing the script will display the abandoned cart count broken down by date. Notice that you can define the portalID to report on by setting the value of the set @portalId=0 line.
Just copy the script into the text area, update the portalId to the correct value then click Execute to display the results.
8396c612-581a-4e3d-8a43-d69bedfb6b74|0|.0|27604f05-86ad-47ef-9e05-950bb762570c
In previous versions of Cart Viper we had two roles that you could use to assign management options for the store admin page.
- Manage Orders
- Manage Store
The Manage Store role give you the ability to do all the day to day task such as creating products, updating categories etc. However it also give you all the setup options for defining a payment gateway and tax options.
Displaying the full range of options available can be overwhelming to some store owners, the store owner’s technology partner has already taken care of setting up the payment gateway and tax options for example.

To create a simpler experience we’ve created a new role called Manage Catalog this allows uses with the defined role to see a more streamlined store admin page tailored to managing products, reviews, categories, coupons and promotions.

If you where to assign a user to both the Manage Orders and Manage Catalog role then they would have a simple store admin page that allows them to run their store without displaying all the configuration options for payment, tax, shipping etc.

Defining the roles required for each security group is set using the Store Admin page, simply select from the drop down the role required.
58036fe8-b96a-4567-8879-4b0e4b19e61d|0|.0|27604f05-86ad-47ef-9e05-950bb762570c
In Store Pickup is a feature which has become very popular in recent years, allowing a customer to purchase items online then pickup then up in the store themselves. Cart Viper store owners can now optionally allow customers to pickup their online order in store. We’ve added the ability to allow “In Store Pickup” in version 1.3 of Cart Viper our shopping cart module for DotNetNuke.
This feature is optional so if you don’t want to offer In Store Pickup the ecommerce store will operate without it.
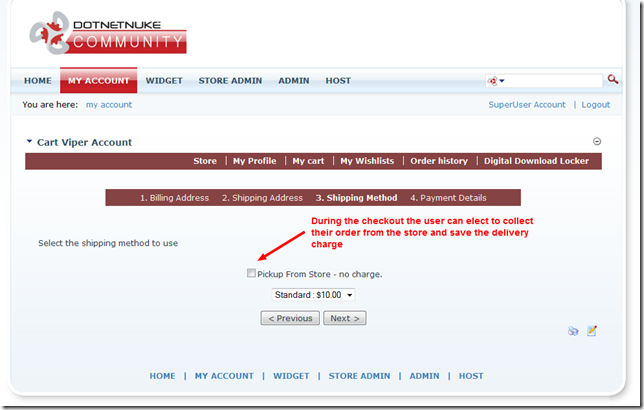
To enable In Store Pickup the store admin would simple need to select the option in the shipping admin page. Once checked this allows customers to select this option during the checkout.
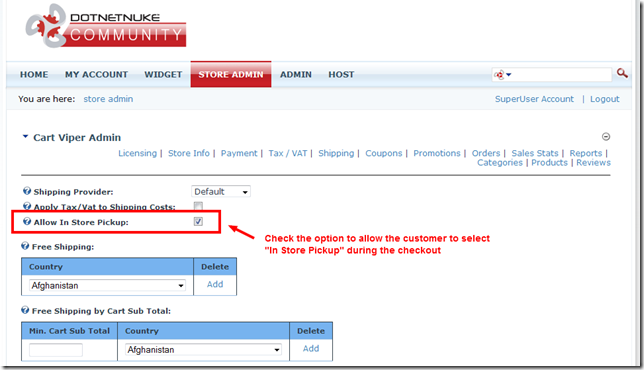
When a customer selects In Store Pickup the delivery charge will be zero for that order. Both the store owner and the customer would get the standard order confirmation email with the delivery option set to “In Store Pickup”.
1b02b737-8d94-43e4-93c5-57138d135018|0|.0|27604f05-86ad-47ef-9e05-950bb762570c