View from inside the viper

What Features Would You Like To See Prioritized?

  October 21, 2013 14:30
by Nigel

Earlier in the month we released version 3.0 of Cart Viper, this contained one of the most significant improvements to Cart Viper - responsive layouts. This fixed a serious short coming with earlier versions of Cart Viper, now with this feature we can format correctly regardless of the size of screen the store is being viewed on.

We already have a head full of ideas for release 3.1 but we want to hear back from you, what features would you prioritize for this release? Perhaps you are using the store and there is a killer feature you think is missing or you tried the store but selected a rivals store based upon some missing functionality?

Either way we are throwing the road map open to the community, please share your ideas with us here or if you prefer email us directly to discuss nigel@cartviper.com. We do value your opinions and are always willing to listen on how we can do things better!

1382380396_519660-164_QuestionMark


Skin Object Real World Samples

  June 17, 2013 13:42
by Nigel

Since the release of version 1.4.0 of Cart Viper the DNN shopping cart we have supported the ability to inject skin objects into our template system. We have previously blogged on how you could write your own skin object and provided some sample code to get you started, but today we are going to highlight some real world examples and hopefully give you some ideas that will take your Cart Viper store to the next level!

A newly launched Cart Viper site that has made use of skin objects is the Kaiwaka outdoor clothing store, when we were tasked with creating their website there were 3 items that we could not achieve by modifying our existing templates / CSS alone.

1) Display a banner image based upon the current selected category:

Screenshot_1   Screenshot_2

2) Display a product summary when hovering over the product image on the product catalog page:

Untitled

3) On the product details page display brand and color images specific to the selected product:

Screenshot_4 Screenshot_3

The 2 key points to remember when working with skin objects are:

a) They can be loaded on any Cart Viper template.

b) By implementing the interface ICartViperSkinObject in your skin object code, Cart Viper will automatically set either the category or product object that the skin object is loaded in ready for you to access in your code.

Its that simple really to take a standard Cart Viper store and really take it to the next level, all with the power and flexibility that skin objects gives you, we hope this post gives you some inspiration for your sites, so download the sample code and let your imaginations run wild!

If you have any questions about skin objects or anything Cart Viper / DNN related please let us know


DotNetNuke Ecommerce Made Easy with the Latest Cart Viper Release 1.6

  April 23, 2012 16:24
by Mark

1063650_37233894Today marks a great day in the development of Cart Viper our ecommerce solution for DotNetNuke, we have just release version 1.6 of the product.

This is a major release with over 35 great new features or improvements to Cart Viper. Over the coming days and weeks we’ll be talking some more about some of the key new features in this release and why it can help you create a great ecommerce store for your customers.

  1. Numerous performance improvements
  2. Ability to sell events - AJAX events calendar module (please note this is an extra add-on).
  3. Google Sitemap support for getting the best possible SEO.
  4. Youtube videos on product details
  5. Categories support Youtube videos.
  6. Pre-checkout notification callback method to validate the order before allowing it be placed within the store.
  7. Export new orders to the Amazon Message Queue SQS, allows integration into external systems to process placed orders.
  8. New payment gateway Cyber Source
  9. Support for three new currencies JOD, HKD, THB and MXN
  10. Mix and match discounts, buy 6 items from this category and get 10% off the items for example.
  11. Let customers request a quote for a large order, moderate and adjust the prices then allow the customer to pay for the order online using a credit card.
  12. Optionally define customer managers that need to approve orders from sub accounts before the order can be placed within the store. Great for B2B sites that need basic order moderation for their corporate clients.
  13. Define a global quantity limit and quantity purchase pattern for a product to mean that only specified quantities of the product can be purchased.
  14. Ability to use custom smtp settings per portal when sending the emails generated by Cart Viper.
  15. Support for an unlimited number of options for a variant, user interface just expands as you enter product options.
  16. The product tabs and related products output is now controlled using a token, so you are free to place this controls anyway you like within the template.
  17. Improved product tab feature including, token support, embed modules, tab header, tab security roles and better sorting.
  18. The template system used to style the store now allows you to import an existing DNN module into the template.
  19. Define product facets which allows customers to filter products based on the product facets, size, colour, type, manufacturer etc.
  20. When search by keywords the products can be filter to a given manufacturer or category using the keyword facet search.
  21. An unlimited number of variants can be imported via csv.
  22. Ability to send order confirmation emails to multiple email addresses with your organisation.
  23. More tokens added to the custom email templates.
  24. Mark a product as in-store pickup only, means the customer must collect direction from the store.
  25. Optional ability to apply a percentage or fixed amount surcharge to an order placed with Paypal Standard.
  26. The store admin can now search for all orders placed during a start and end date.
  27. New order status - partial shipped.
  28. Batch printing of orders, select the date range and the order status then generate a PDF containing all the orders, print out and include with your package.
  29. Ability to restrict which states in the USA you will ship goods to.
  30. Cyber Source external tax gateway support, exact tax calculations based on the customer’s address.
  31. Newsletter subscribers management page to display a list of existing subscribers. Export the list to CSV.
  32. Allow products to be visible only to users with the required role.
  33. Include a shipping tracking number when you dispatch a customer’s order.
  34. Support for defining tax rates by each Canadian Province for stores located in Canada.
  35. New mega menu style category menu this can be rendered either vertically or horizontally. Optionally we can output the standard DNN menu into the mega menu to create a complete menu solution for your store.
  36. Recurring billing support when using Authorize.net payment gateway.

We are excited to have created this release and we hope you’ll take the free 14 day trial and see for yourself.

Existing customers from earlier versions can download the new version and upgrade for free, simply download and install the free trial, your existing license will unlock this to a full version.
We strongly recommend that you follow the upgrade steps in the manual and take a full backup of your database and existing site.


Performance Improvements to Cart Viper

  March 21, 2012 21:16
by Mark

graph_arrowA major improvement in Cart Viper 1.6 is that we’ve tuned the performance of the application start at the database level and running all the way to the business logic to make your store operate faster.

All aspects of the application, browsing the store, searching, viewing the product detail and checkout are now significantly faster. Recent research has suggested that Google takes into account the speed of site when ranking a page, “faster sites create happy users”. The improves we have made can only help improve your ROI on your store.

The net effect is the store runs up to 3x fast than the previous version of Cart Viper.

Unlike other DNN vendors we currently offer existing customer the ability to upgrade to the latest version free of charge. So if you are already a customer why don’t consider upgrading to the new version today.

If you are new to Cart Viper then take our free no sign up, no hassle 30 days trial.
We want to create the best ecommerce module in the DNN arena.


Cart Viper Features Version 1.4.1

  November 4, 2011 16:16
by Nigel

Following on our discussion of new features of version 1.4.1 of Cart Viper the DNN shopping cart we are going to discuss a few of the smaller features that have been added:

Import product data sheet via CSV file:

In version 1.4.0 we added the ability to include a data sheet for a product, we have now extended our .CSV product import to allow you to import the product data sheet location. Importing the data sheet field is straight forward, you simply add the column “PDFDataSheet” then reference the datasheet relative to the portal root folder.

CropperCapture[14]

The above example shows a valid .CSV import file, in our example our sample.pdf is located in the below folder on our server:

Portals/PORTALID/datasheet/

Before the import occurs you should either ensure the PDF is already on the server either by uploading via the “Admin File Manager” or by using FTP to place the PDF on the server then clicking “Synchronize files”.

Template Driven Mini Cart

In order to give you more control and flexibility of the look and feel of the Cart Viper mini cart control we have now made this control template based as per the other Cart Viper controls.

The benefits of this are:

  • Each portal can have their own customized different mini cart.
  • Content can now be easily injected into the cart e.g. images, text, hyperlinks, etc
  • Skin objects can now be injected into the mini cart control

The below screenshot shows the basic Cart Viper mini cart template and a number of the token that are supported:

CropperCapture[15]

Category Description Now Supports Full HTML Content

We have now extended the category description to support full HTML content. By using the standard HTML editor you can now enter any HTML content for a category description and have it output on the product catalogue page:

Admin interface

CropperCapture[16]

Example Output

CropperCapture[17]

These features were made based on client feedback if you have any suggestions please contact us.


Quantity Discount Bands

  October 27, 2011 12:16
by Nigel

A further new feature in release 1.4.1 of Cart Viper the advanced DotNetNuke shopping cart is the ability to define quantity discount bands. This means you can specify discounts based on the quantity of a product that a user purchases.

Configuring quantity discount bands is a straight forward process, once the product has been added to the store, select the “Qty Discount” tab:

CropperCapture[4]

From the above example you can see we have created 3 discount bands meaning the user will receive the following discounts:

  • Purchase 1 –10 of this product and receive a 2% discount per product off the product base price.
  • Purchase 11 –20 of this product and receive a 3% discount per product off the product base price.
  • Purchase 21 – 50 of this product and receive a 4% discount per product off the product base price.

In our example we have chosen to offer a percentage discount, however it is also possible to enter a unit price that the customer should be charged by unselecting “percentage discount”.

When quantity discount bands have been configured for a product they will be outputted on the product details page clearly showing the banding and the amount they will be charged per unit:

CropperCapture[5]


Variant Image Support

  October 27, 2011 11:39
by Nigel

One of the more advanced features added to release 1.4.1 of Cart Viper the DNN shopping cart is the ability to define a different image for each product variant, then when the user selects that variant combination that image is then automatically displayed as the main product image.

Configuring variant images in Cart Viper is a straight forward 4 step process:

Step 1: Create your product as normal in the store admin, in this example we are going to create a poster so when the user selects the different poster type the appropriate image is then displayed to them.

Step 2: Create the variant type for your product, in our example we are going to create a variant “poster type” and enter the different type of posters we are going to sell:

CropperCapture[1]

Step 3: Upload your product images that will be displayed for the variants – this is completed via the standard product images tab:

CropperCapture[2]

Note you can still define the main product image (highlighted in yellow) – this will be the default image and will be displayed on the product catalogue, initially on the product details page and also if you do not specify a variant image.

Step 4: From the variants tab select “variant images”, from here you will see all the images you have uploaded for this product along with each possible variant combination. Now it is simply a case of matching the variant combination to the correct image:

CropperCapture[3]

As explained earlier it is not necessary to assign each variant combination an image as the default product image will be displayed in that event. It is now possible to view the results, the following link shows our example, note when the user changes the variant the image and the price update to reflect the options that the user is currently looking at.


Checkout With Prepaid Credit

  September 8, 2011 14:29
by Nigel

A further new feature added to Cart Viper the DotNetNuke shopping cart is the ability for the user to pay for items in your store with prepaid credit. This checkout option can be selected alongside any combination of Paypal standard, Google Checkout or offline payment method. Giving your customers multiple options on how they would like to purchase their goods.

CropperCapture[10]

In order for a customer to use the prepaid checkout option they must first purchase credit to use in your store, they can do this from the “my prepaid balance” option from the “Cart Viper My Account” module, from here they can also view their current balance:

CropperCapture[11]

Prepaid credit can also be added directly onto a users account by editing their DNN profile, note due to a “quirk” with how DNN stores data in the profile property, the monetary amount need to be entered in cents. So the below would equal $85.60 of prepaid credit – the option to enter credit onto a users profile is only available to users with admin or host permissions to the DNN site:

CropperCapture[12]

Now when the customer views the payment summary page they can chose to pay using their prepaid credits or any of the other payment options that are configured for the store. If they pay via their prepaid credits the amount will be deducted from their balance:

CropperCapture[13]

If however the total cost of the order is greater than their available points balance the prepaid checkout option is hidden and they must select from one of the other configured payment options:

CropperCapture[14]

The prepaid credits feature was developed based on a customization request from one of our customers, if you have any features you would like to see added to Cart Viper please let us know.


New 1.4.0 Features

  September 5, 2011 15:55
by Nigel

Following on our discussion of new features in release 1.4.0 of Cart Viper the DotNetNuke ecommerce solution we are going to discuss several new features that have been added:

Optionally attach order PDF to order confirmation email:

The ability to create a PDF receipt of an order has existed in Cart Viper for some time now, however we have now allowed the store admin to attach this PDF to the email that is sent to the customer to confirm their order. The order PDF can still be downloaded via the order details section, however by sending it along with the order confirmation email the customer will have a copy of this with their order confirmation for their records:

CropperCapture[2]

Record Users IP Address During Checkout:

A further new enhancement is that a customer IP address is now automatically recorded during the checkout process and stored alongside their order. The customer’s IP address is only ever displayed to the store admin when they are viewing a particular order:

CropperCapture[3]

Anonymous Users To Checkout With Digital Downloads:

Previously when an anonymous user attempted to checkout with a digital download in their cart they would be redirected to the login screen. Now in version 1.4.0 anonymous users can now checkout and download their products without having to register/login into your DNN site. This feature should reduce the chance of users abandoning their carts during the checkout process if they are unwilling to share their details with your site.

If you have any feature requests for Cart Viper please contact us.


Using Skin Objects in Cart Viper – Part 2

  August 28, 2011 15:08
by Mark

Part 1 of of using skin object in Cart Viper focused on using an existing skin objects to add content to the templates used in our module. This part will focus on how to create custom skin objects to manipulate the product and category objects in Cart Viper.

Since release 1.4.0 we have add the ability for you to customise the output of the store using skin object, today I want to show you an advanced feature that lets you write custom code in .net to create skin objects which you can use in the store templates.

Lets take an example, I’ve got my store all setup but really want to display the logo for the manufacturer of each product. Cart Viper has no way to do this, however creating a custom skin object we can read the manufacturer value for the product and output a logo with ease.
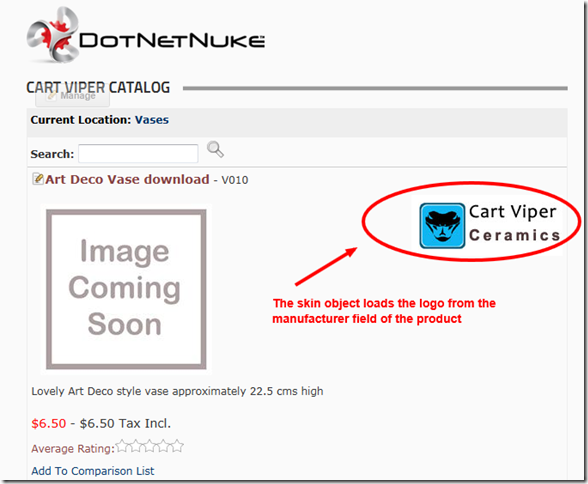
Display an icon for the manufacturer


Displaying a Manufacturer Logo for a Product

Lets take a walk through creating the skin object to see how it works.

First I’ve uploaded my logos into a folder I’ve created in my portal home directory. I’m going to have my skin object display these on the product details page.
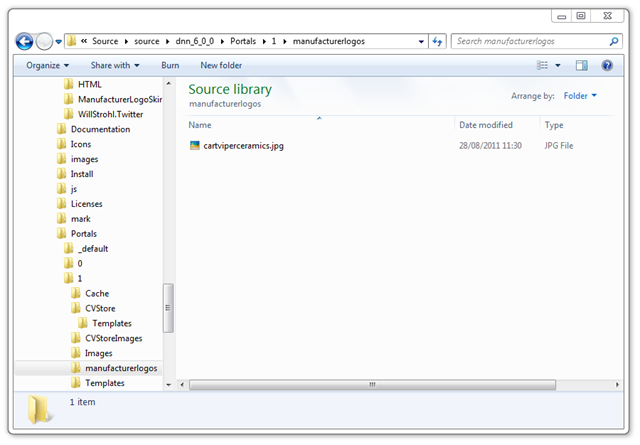
Folder contain the logos to use for the products

Next I’m going to create a new project in Visual Studio, I just need a Web Application Project, its important that we create this with in the DesktopModules folder. Notice that we don’t need to check “Create directory for solution”.
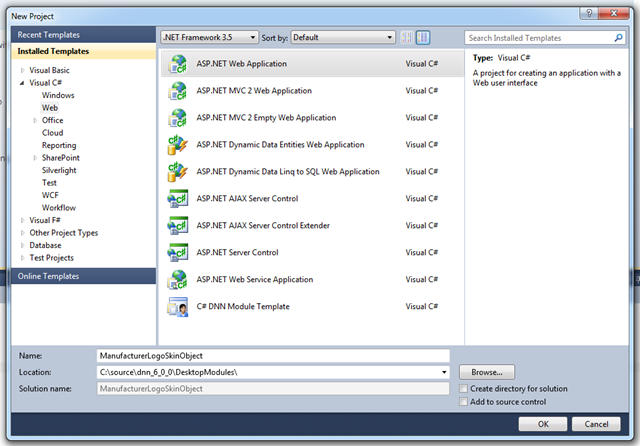
Creating the new project for the skin object

In order to create a skin object we need to inherit from a base class in DotNetNuke plus we want to use an interface from Cart Viper to allow the skin object to get Product object.
So we need to add two references to files located in the /bin folder of the portal.
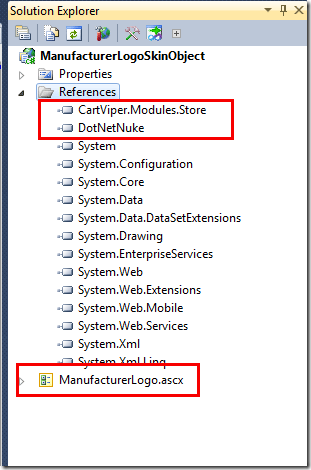
Solution explorer showing the reference and the singel ascx control

When first creating the project Visual Studio will create some default folders and files which we don’t need so I’ve deleted those and added a single web User Control called ManfacturerLogo.ascx.

An important setting you need to make is to have the build output directly into the /bin folder of the portal.
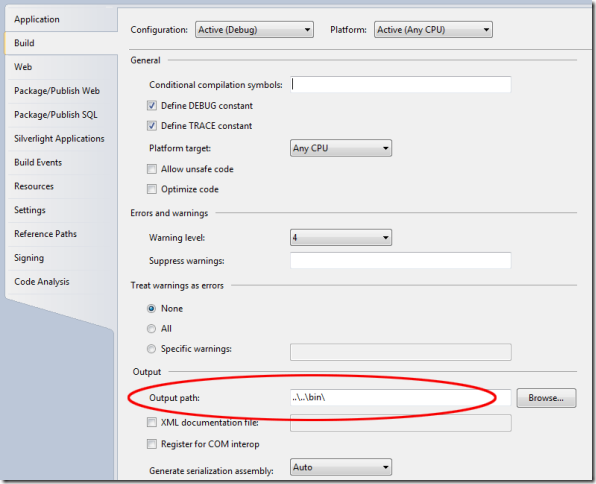
Setting the build output path to the /bin folder

Lets take a look at the code in the ascx file, I’ve just got an image control which will output the logo for the manufacturer.

<%@ Control Language="C#" AutoEventWireup="true" 
CodeBehind="ManufacturerLogo.ascx.cs" 
Inherits="ManufacturerLogoSkinObject.ManufacturerLogo" %>

<asp:Image runat="server" ID="imgManLogo" Visible="false"/>

Looking at the code behind file shows how the skin object works.

using System;
using System.Collections.Generic;
using System.Linq;
using System.Web;
using System.Web.UI;
using System.Web.UI.WebControls;
using DotNetNuke.UI.Skins;
using CartViper.Modules.Store.Components.SkinObject;

namespace ManufacturerLogoSkinObject
{
    public partial class ManufacturerLogo : SkinObjectBase, ICartViperSkinObject
    {
        protected void Page_Load(object sender, EventArgs e)
        {
            if (Product != null)
            {
                //get the manufacturer value, if its not null or empty
                //make into the path to the url for the logos folder
                string manufacturer = Product.Manufacturer;
                if (!string.IsNullOrEmpty(manufacturer))
                {
                    imgManLogo.ImageUrl = string.Format(
											PortalSettings.HomeDirectory + 
											"ManufacturerLogos/{0}.jpg", 
											manufacturer.Replace(" ", ""));

                    imgManLogo.AlternateText = manufacturer;
                    imgManLogo.Visible = true;
                }
            }
        }


        public CartViper.Modules.Store.Catalog.CategoryInfo Category
        {
            get;
            set;
        }

        public CartViper.Modules.Store.Catalog.ProductInfo Product
        {
            get;
            set;
        }
    }
}

Looking at the code the important parts to notice the class inheritance, we need to use SkinObjectBase which is located in the DotNetNuke.UI.Skins as the base class.
We are also implementing the interface CartViper.Modules.Store.Components.SkinObject.ICartViperSkinObject this interface allows the template engine in Cart Viper the ability to set the properties Category and Product with the current product data.

Note its only in the following templates that the ICartViperSkinObject properties will be set by the template engine.

  • ProductDetail.htm
  • ProductList.htm

In other templates the Category and Product properties will not be set and will be null.

The main work is completed in the Page_Load method, we check to see if we have Product object and then if the product has a value for the manufacturer property. We then remove all spaces from the manufacturer value and load that as the image source.

To use the module in DotNetNuke we need to have a DNN file to install the skin object.

<?xml version="1.0" encoding="utf-8" ?>

<dotnetnuke type="Package" version="5.0">
    <packages>      
        
    <package name="ManufacturerLogo" type="SkinObject" version="01.00.00">
        <friendlyName>ManufacturerLogo</friendlyName>
        <description>ManufacturerLogo</description>
        <owner>
            <name>Cart Viper</name>
            <organization>CartViper</organization>
            <url>www.cartviper.com</url>
            <email>mark@cartviper.com</email>
        </owner>
        <license/>
        <releaseNotes/>
        <components>
            <component type="SkinObject">
                <moduleControl>
                    <controlKey>MANUFACTURERLOGO</controlKey>
                    <controlSrc>
			DesktopModules\ManufacturerLogoSkinObject\ManufacturerLogo.ascx
					</controlSrc>
                    <supportsPartialRendering>False</supportsPartialRendering>
                </moduleControl>
            </component>
            <component type="File">
                <files>
                    <basePath>
					DesktopModules\ManufacturerLogoSkinObject
					</basePath>
                    <file>
                        <name>ManufacturerLogo.ascx</name>
                    </file>
                </files>
            </component>
            <component type="Assembly">
                <assemblies>
                    <assembly>
                        <path>bin</path>
                        <name>ManufacturerLogoSkinObject.dll</name>
                        <version>01.00.00</version>
                    </assembly>
                </assemblies>
            </component>
        </components>
    </package>
      
    </packages>
</dotnetnuke>

Then finally we just add the skin object into our ProductDetail.htm to get the manufacturer logo into the product details page.

<div class="StoreDetailContainer">
  <div class="StoreDetailContainer-Content">
    <div class="Normal productDetailPadding">[EDIT][MODELNAME] - [MODELNUMBERVALUE]</div>
    <div style="float:right">[SKINOBJECT:MANUFACTURERLOGO]</div>
    <div class="Normal productDetailPadding">
        [MEDIUMIMAGE]    
        <div style="clear:both;"></div>
        [ADDITIONALIMAGESGALLERY]
        <div style="clear:both;"></div>
        [DESCRIPTION]
    </div>
    <div class="StoreClear productDetailPadding">[MSRP]</div>
    <div class="StoreClear productDetailPadding">[PRICE] [VATPRICE]</div>
	<div class="Normal genericColour productDetailPadding">[AVERAGERATING]</div>
    <div class="productDetailPadding">[ADDTOCOMPARISONLIST]</div>
    <div>[EMAILAFRIEND]</div>
    <div>[PRODUCTVARIANTS]</div>
    <div class="productDetailPadding">[PRODUCTVISUAZLIER]</div>
    <div class="genericColour addToCartWrapper">[ADDQUANTITY] [ADDTOCART]</div>
     <div>[ADDTOWISHLIST]</div>
    <div style="clear:both;"></div>
    <div class="Normal productDetailPadding">[FACEBOOKLIKEBUTTON]</div>
  </div>
</div>

Conclusion

Using skin objects is a great way to customise Cart Viper, its lets you inject your own code and UI controls into the templates. Using this feature will let you tailor Cart Viper to your requirements with ease.

Download the source file