View from inside the viper

New Simpler Store Management Role

  June 6, 2011 12:45
by Mark

In previous versions of Cart Viper we had two roles that you could use to assign management options for the store admin page.

  • Manage Orders
  • Manage Store

The Manage Store role give you the ability to do all the day to day task such as creating products, updating categories etc. However it also give you all the setup options for defining a payment gateway and tax options.

Displaying the full range of options available can be overwhelming to some store owners, the store owner’s technology partner has already taken care of setting up the payment gateway and tax options for example.

Manage Store role options

To create a simpler experience we’ve created a new role called Manage Catalog this allows uses with the defined role to see a more streamlined store admin page tailored to managing products, reviews, categories, coupons and promotions.

Manage Catalog role options

If you where to assign a user to both the Manage Orders and Manage Catalog role then they would have a simple store admin page that allows them to run their store without displaying all the configuration options for payment, tax, shipping etc.

Manage Catalog and Manage Orders roles assigned to a user

Defining the roles required for each security group is set using the Store Admin page, simply select from the drop down the role required.


In Store Pick Up

  June 6, 2011 12:20
by Mark

In Store Pickup is a feature which has become very popular in recent years, allowing a customer to purchase items online then pickup then up in the store themselves. Cart Viper store owners can now optionally allow customers to pickup their online order in store. We’ve added the ability to allow “In Store Pickup” in version 1.3 of Cart Viper our shopping cart module for DotNetNuke.

This feature is optional so if you don’t want to offer In Store Pickup the ecommerce store will operate without it.

To enable In Store Pickup the store admin would simple need to select the option in the shipping admin page. Once checked this allows customers to select this option during the checkout.

enabling in store pick up in DNN shopping cart

When a customer selects In Store Pickup the delivery charge will be zero for that order. Both the store owner and the customer would get the standard order confirmation email with the delivery option set to “In Store Pickup”.

In store pickup option during the checkout process


Optional Customer Notes During Checkout

  May 26, 2011 23:12
by Mark

The latest version of Cart Viper 1.3.0 now allows you to optionally allow the customer to enter some additional notes about their order during the order process.
This allows for cases where the user wants to enter some shipping information or purchase order details during the order process.

As the store admin you can turn on the optional order notes using the settings page on the my account module.

Enabling the order notes textbox

During the order process the customer can then enter whatever notes they need, the notes will then be visible to the store admin when viewing the completed order.

Checkout process with the optional notes field displayed


Online Credit Card Improved Checkout

  May 26, 2011 22:35
by Mark

The new release 1.3 of Cart Viper our shopping cart solution for DNN now has an improved checkout process which shows the icons of the credit cards accepted in your store.

creditcard icons

Additionally we’ve made the checkout process easier to give customer help to locate the the CVV number for a credit card.

cvvhelp

This is all part of our continually improvement in Cart Viper to make it easier for customers to checkout, thus increasing your conversion rate.

Customising the Credit Card Icons and CVV Help

The changes to the checkout are fully customisable allowing you to display your own credit card icons and cvv help in place of the standard out of the box version.

To change the credit card accepted image you simple need to modify the a resource file for the payment gateway, then this file will be displayed to the browser.
The key in the resource file to change is creditCardLogoFileName.Text this should then just contain the filename of the image to display. The file should be placed into the /Portals/x/CVStore/Templates/Images folder.

Customising the CVV help follows a similar format, however for that we use three keys in the resource file of the selected payment provider.

Key Name Description
cvvHelp.Text The body of the help message this can contain HTML.
cvvHelpRearImage.Text Filename of the image to use for the rear image of a credit card showing the location of the CVV.
cvvHelpFrontImage.Text Filename of the image to use for the front image for a credit card showing the location of the CVV.

We recommend that you view the existing entry for the cvvHelp.Text item and use this as the basis for your own customisations. Checkout the guide to customising the resource files used in Cart Viper for additional information.


Cart Viper version 1.3 released

  May 25, 2011 15:56
by Nigel

Here are Cart Viper we are pleased to announce version 1.3 of our DotNetNuke ecommerce module has just been released, this release is packed full of new features:

If you feel there is something that is missing please contact us and we will be happy to discuss your requirements.


Customising the Captions in Cart Viper

  May 8, 2011 18:27
by Mark

Cart Viper allows you to customise the captions used throughout the module, this allows you to change the captions to better suit your requirements for example or client.

All the captions are stored in a resource files (.resx) within the module folder, however we do not recommend that you edit these files since any future upgrade of Cart Viper will replace your modified files ones from the new package.
Instead you should use a portal specific resource file which will not get over written with future upgrade and also means the change won’t affect other portals.

DotNetNuke first looks for a resource key it needs in a portal specific resource file before falling back to general resource file if unable to locate the key.
Since we have this fall back feature our portal specific resource file only needs to contain the resource caption we want to change, the standard resource file will supply the other captions.

Lets take a look at an example, I’m going to change the caption on the mini cart module to use the world “Basket” in place of “Cart”.
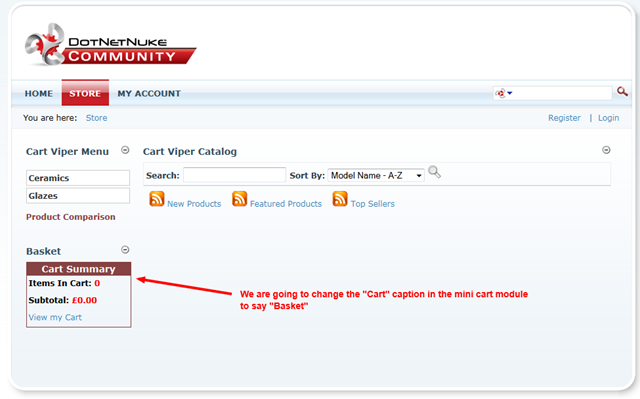
mini_cart_module

The first thing we need to do is locate the correct resource file.

The resource files are located in the folder /DesktopModules/CartViper/App_LocalResources

CropperCapture[211]

Each ASP.net ascx control has 4 resource files, each for the 4 different languages we support. For the demo here I’m just going to change the English version however the same principle can be applied to any of the other languages.
Additionally we have a SharedResources.resx file which contains captions used by the AJAX code to return the correct messages to display.

Since we are going to change the captions on the Mini Cart control the file we need to look at is MiniCart.ascx.resx

Lets go a head and open that file with notepad or similar, the file itself is just a XML document that has key value pairs for the captions.
Most of the file contains comments and boiler plate entries, the place we need to look at are the elements with the <data> element.
The name attribute of the entry will be the name of ASP.net control that is rendering the caption.

CropperCapture[212]

I've created a blank resource file which you can use as the basis for the new file. Into this file we are going to copy the entries we want to change. I’m going to copy the following entries into my new file.

<data name="btnViewCart.Text" xml:space="preserve"> 
  <value>View my Cart</value> 
</data> 
<data name="AddAnother.Text" xml:space="preserve"> 
  <value>Add one or more {0} to the cart.</value> 
</data> 
<data name="lblNumberItemsText.Text" xml:space="preserve"> 
  <value>Items In Cart:</value> 
</data> 
<data name="lblYourCart.Text" xml:space="preserve"> 
  <value>Cart Summary</value> 
</data>

After copying these into the template file I’m going to change the word “cart” to “basket” in the value elements.

The most important part of implementing the change is to name the file correctly, the file needs to be named with the original file name but needs .Portal-X (where X is the ID of the portal you are wanting to apply the change for) inserted just before the .resx extension ending.

Since the original file name was MiniCart.ascx.resx the new portal specific change needs to be named MiniCart.ascx.Portal-2.resx (my demo portal has an ID of 2) and placed into the folder /DesktopModules/CartViper/App_LocalResources

Refreshing the page shows the new resource file has been picked up by DotNetNuke.
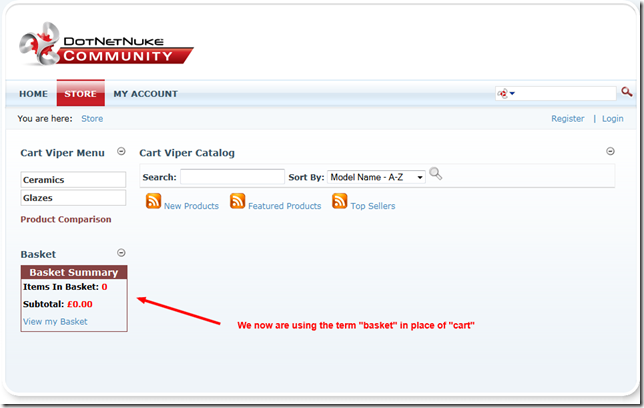
mini_cart_module_basket

My complete resource file is listed below for reference.

MiniCart.ascx.Portal-2.resx

<?xml version="1.0" encoding="utf-8"?>
<root>
  <xsd:schema id="root" xmlns="" xmlns:xsd=http://www.w3.org/2001/XMLSchema 
xmlns:msdata="urn:schemas-microsoft-com:xml-msdata"> <xsd:import namespace="http://www.w3.org/XML/1998/namespace" /> <xsd:element name="root" msdata:IsDataSet="true"> <xsd:complexType> <xsd:choice maxOccurs="unbounded"> <xsd:element name="metadata"> <xsd:complexType> <xsd:sequence> <xsd:element name="value" type="xsd:string" minOccurs="0" /> </xsd:sequence> <xsd:attribute name="name" use="required" type="xsd:string" /> <xsd:attribute name="type" type="xsd:string" /> <xsd:attribute name="mimetype" type="xsd:string" /> <xsd:attribute ref="xml:space" /> </xsd:complexType> </xsd:element> <xsd:element name="assembly"> <xsd:complexType> <xsd:attribute name="alias" type="xsd:string" /> <xsd:attribute name="name" type="xsd:string" /> </xsd:complexType> </xsd:element> <xsd:element name="data"> <xsd:complexType> <xsd:sequence> <xsd:element name="value" type="xsd:string" minOccurs="0" msdata:Ordinal="1" /> <xsd:element name="comment" type="xsd:string" minOccurs="0" msdata:Ordinal="2" /> </xsd:sequence> <xsd:attribute name="name" type="xsd:string" use="required" msdata:Ordinal="1" /> <xsd:attribute name="type" type="xsd:string" msdata:Ordinal="3" /> <xsd:attribute name="mimetype" type="xsd:string" msdata:Ordinal="4" /> <xsd:attribute ref="xml:space" /> </xsd:complexType> </xsd:element> <xsd:element name="resheader"> <xsd:complexType> <xsd:sequence> <xsd:element name="value" type="xsd:string" minOccurs="0" msdata:Ordinal="1" /> </xsd:sequence> <xsd:attribute name="name" type="xsd:string" use="required" /> </xsd:complexType> </xsd:element> </xsd:choice> </xsd:complexType> </xsd:element> </xsd:schema> <resheader name="resmimetype"> <value>text/microsoft-resx</value> </resheader> <resheader name="version"> <value>2.0</value> </resheader> <resheader name="reader"> <value>System.Resources.ResXResourceReader, System.Windows.Forms, Version=2.0.0.0, Culture=neutral,
PublicKeyToken=b77a5c561934e089</value> </resheader> <resheader name="writer"> <value>System.Resources.ResXResourceWriter, System.Windows.Forms, Version=2.0.0.0, Culture=neutral,
PublicKeyToken=b77a5c561934e089</value> </resheader> <!-- CART VIPER - CUSTOM resx TEMPLATE ADD YOUR CUSTOM DATA ENTRIES INTO THE FILE BELOW THIS COMMENT --> <data name="btnViewCart.Text" xml:space="preserve"> <value>View my Basket</value> </data> <data name="AddAnother.Text" xml:space="preserve"> <value>Add one or more {0} to the basket.</value> </data> <data name="lblNumberItemsText.Text" xml:space="preserve"> <value>Items In Basket:</value> </data> <data name="lblYourCart.Text" xml:space="preserve"> <value>Basket Summary</value> </data> </root>


Cart Viper 1.2.7 Released

  May 6, 2011 11:04
by Mark

Today we’ve released a new version of Cart Viper our Ecommerce store module for DotNetNuke.

This release is to fix a breaking change in jQuery 1.6 which was released on the 3rd of May 2011. The jQuery method .attr(“checked”) which before could be used to determine if a checkbox was selected can no longer be used. You can read more about this breaking change on the jQuery release notes.

The new version of Cart Viper 1.2.7 works with jQuery 1.4.3 right up to the newly released 1.6


Cart Viper Review

  April 26, 2011 10:51
by Nigel

Here at Cart Viper we like to work closely with our customers and it is always nice to get great feedback on our DotNetNuke eCommerce solution, we are pleased to announce we have just began working with C 2 Internet Solutions and they are more than happy with how the relationship is progressing:

“This is by far the best cart I have used for a DNN site. It is simple to setup, uploading products is a breeze and the developers actually support there product unlike the big name carts like Smith Cart. This cart does not have the constant bugs that other carts have and management is a breeze.”

Chuck Chapman

C 2 Internet Solutions

CropperCapture[42]


Anchor Name Support

  April 22, 2011 11:07
by Mark

New in Cart Viper 1.2.6 is the ability to define an anchor name that should be appended to the category menu and the product details links.

This allows sites which have content above the store to automatically jump the to location of the store on the page. Take a look at the video below to see an example of this.


To enable and setup this feature it is really simple, in the demo video it takes me only 3 minutes to configure and test.


That all there is to it, we hope you find this feature useful.


Cart Viper Version 1.2.6 Released

  April 14, 2011 11:51
by Mark

New Release of Cart Viper 1.2.6Yesterday we released the next version of Cart Viper 1.2.6.

This new release contains lots of new and improved features along with bug fixes to minor issues.

  • Create and manage an unlimited number of tabs for a product.
  • Google Checkout is supported as a payment gateway.
  • Carousel template for use with the Related Products, Recently View Products and Product widget module.
  • The Category menu can now optionally expand and collapse the items in the menu.
  • Order PDF supports adding the Model Number or SKU field to each line item ordered.
  • Payment method displayed on the confirmation emails, order and PDF generated by Cart Viper.
  • Ability to display a MSRP which is struck out in the store front.
  • Out of Stock flag on a product.
  • Wish lists now support product variants.
  • Ability to make a wish list public and share the link with friend.
  • Ability to operate a store without an online payment gateway just using the offline payment option.
  • Ability to display prices inc VAT in the cart and mini cart.
  • Products support serial numbers with automatic assignment of the next free serial number.
  • Optionally collect Company Name and/or VAT number at the checkout stage.
  • Numerous minor bug fixes

With that release out of the door we are now turning out attention to the next release, if you’ve got a suggest or idea you would like to see added please let us know.